| Last time we looked at my electric relay solution to a problem presented by a 120 volt alternating current (VAC) drive motor operating within an x-ray film processing machine. Now let’s see what happens when we press the button to set the microprocessor into operation.
Figure 1Figure 1 shows that when the button is depressed, the computer program contained within the microprocessor chip goes into action, signaling the start of the control initiative. 5 volts direct current (VDC) is supplied to Output Lead 2, and FET 2 (Field Effect Transistor 2) becomes activated, which allows electric current from the 12 VDC supply to course into the 12 VDC electric relay, through the relay’s wire coil, then conclude its travel into electrical ground. The electric relay components, including a wire coil, steel armature, spring, and normally open (N.O.) contact, are shown within a blue box in our illustration. Current flow is represented by red lines. The control initiative passes from the microprocessor to FET 2, and then to the 12 VDC electric relay, just as the Olympic Torch is relayed through a system of runners. We learned in one of my previous articles on industrial control that when an electric relay coil is energized, electromagnetic attraction pulls its steel armature towards the wire coil and the N.O. electrical contact. In Figure 1 this attraction is represented by a blue arrow. With the N.O. contact closed the drive motor is connected to the 120 VAC input, and the motor is activated.
Figure 2
Figure 2 shows what happens after the button is depressed. The computer program is activated, directing the microprocessor chip to keep 5 VDC on Output Lead 2 and FET 2 while the prerequisite 40 minutes elapses. Thus the relay remains energized and the motor remains on during this time.
Figure 3
In Figure 3, at the end of the 40 minute countdown, the computer program applies 0 VDC to Output Lead 2. FET 2 then turns off the current flow to the relay and it begins to de-energize, causing the spring to pull the steel armature away from the N.O. contact and the 120 VAC power supply to be interrupted. The motor is deactivated. At the same time, the computer program applies 5 VDC to Output Lead 1 and FET 1 for 2 seconds. FET 1 turns on the flow of current through the buzzer, causing it to sound off and signal that the x-ray film processing machine is ready for use. Next time we’ll look at how transistors are used to regulate voltage within direct current power supplies like the one shown in Figure 3 above. ____________________________________________ |
Posts Tagged ‘spring’


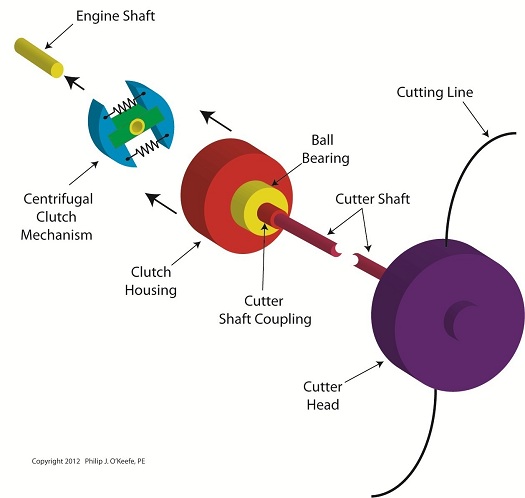
Mechanical Power Transmission – The Centrifugal Clutch Powers Up
Sunday, May 6th, 2012| Energy, or power, requires direct contact to transfer. In most cases. One notable exception to this rule of physics that I know of is the martial art of Tai Chi. But when we’re talking golf, for example, if you don’t’ make contact with that ball, it ain’t gonna fly, no matter how many swings you take.
Last time we looked at a gas powered trimmer’s engine, centrifugal clutch mechanism, clutch housing, and cutter head and how they’re assembled together. With the centrifugal clutch assembled into the grass trimmer, let’s refer to Figure 1 to see what it looks like when we start the engine and run it at low, idle speed.
Figure 1
Figure 1 represents a view from the back of the clutch housing, revealing the centrifugal clutch housing inside. At idle speed there are only a few millimeters of space between the blue clutch mechanism shoes and red clutch housing, but the important point is that they’re not touching the clutch housing. Because they’re not, the engine’s power can’t be transferred from the engine to the clutch housing, and it remains stationary, that is, the clutch housing doesn’t spin. Since the grass trimmer’s cutter head is coupled to the clutch housing, it also remains stationary. Figure 2 shows what happens from the same viewpoint when we press the throttle trigger, making the engine spin at operational speed.
Figure 2
With the engine spinning faster the centrifugal force, Fc, acting upon the clutch shoes overcomes the tension of the clutch mechanism springs, and the shoes move away from each other along the green boss. They will eventually make contact with the clutch housing, enabling power from the engine to transfer to the clutch housing via the centrifugal clutch mechanism. The clutch housing and cutter head spin along with the engine, and we can now cut grass. When we let go of the engine’s throttle trigger it again slows to idle speed, the shoes no longer touch the insides of the clutch housing, and the housing and cutter head stop spinning, as we saw in Figure 1. Next time we’ll talk about centrifugal clutch failures, things that can go wrong with them and keep them from operating properly. ____________________________________________
|


Industrial Control Basics – Unlatching the Latching Circuit
Sunday, February 5th, 2012| When I had the misfortune of getting stuck in my Uncle Jake’s outhouse as a kid, I would allow my hysteria to get the best of me and forget my uncle’s instructions on how to get out. It was a series of raps and a single kick that would prove to be the magic formula, and once I had calmed myself down enough to employ them I would succeed in working the door’s rusty latch open. Our relay circuit below has a much less challenging system to effectively unlatch the pattern of electric current.
Figure 1 shows our latched circuit, where red lines denote the flow of current.
Figure 1
If you recall, the relay in this circuit was latched by pressing Pushbutton 1. When in the latched state, the magnetic attraction maintained by the wire coil and steel core won’t allow the relay armatures to release from their N.O. contacts. The relay’s wire coil stays energized via Button 2, the red bulb goes dark while the green bulb remains lit, even though Button 1 is no longer actively depressed. Now let’s take a look at Figure 2 to see how to get the circuit back to its unlatched state.
Figure 2
With Button 2 depressed the flow of current is interrupted and the relay’s wire coil becomes de-energized. In this state the coil and steel core are no longer magnetized, causing them to release their grip on the steel armatures. The spring will now pull them back until one of them makes contact with the N.C. contact. The red bulb lights again, although Button 2 is not being actively depressed. At this point the electric relay has become unlatched. It can be re-latched by depressing Button 1 again. Let’s see how we can simplify Figure 2’s representation with a ladder diagram, as shown in Figure 3.
Figure 3
We’ve seen how this latching circuit activates and deactivates bulbs. Next time we’ll see how it controls an electric motor and conveyor belt inside a factory. ____________________________________________ |


Industrial Control Basics – Electric Relay Example
Saturday, January 14th, 2012| When a starving monkey is faced with two buttons, one representing access to a banana, the other cocaine, which will he push? The cocaine, every time. The presence of buttons usually indicates a choice must be made, and electric relays illustrate this dynamic.
Last week we looked at a basic electric relay and saw how it was used to facilitate a choice in electricity flow between two paths in a circuit. Now let’s see what happens when we put a relay to use within a basic industrial control system making use of lit bulbs.
Figure 1
Figure 1 shows an electric relay that’s connected to both hot and neutral wires. At the left side is our pushbutton and the hot wire, on the right two bulbs, one lit, one not, and the neutral wire. No one is depressing the pushbutton, so an air gap exists, preventing current from flowing through the wire coil between the hot and neutral sides. With these conditions in place the relay is said to be in its “normal state.” The relaxed spring positioned on the relay armature keeps it touching the N.C. contact. This allows current to flow between hot and neutral through the armature and the N.C. contact. When these conditions exist the red bulb is lit, and this is accomplished without the need for anyone to throw a switch or press a button. In this condition the other lamp will remain disengaged and unlit. Now let’s refer to Figure 2 to see what happens when someone presses the button.
Figure 2
When the button is depressed the air gap is eliminated and the coil and wire become magnetized. They will attract the steel armature closer to them, the spring to expand, and the armature to engage with the N.O. contact. Under these conditions current will no longer flow along a path to light the red bulb because an air gap has been created between the armature and N.C. contact. The current instead flows through the N.O. contact, lighting the green bulb. It will stay lit so long as someone holds the button down. If our monkey were faced with the scenarios presented in Figures l and 2 and a banana was placed in the position of the red bulb, the cocaine in the position of the green, he might find that the regular delivery of bananas that takes place when the relay is in the N.C. contact position is enough to keep him happy. In this state he might be so full of bananas he won’t want to expend the energy to engage the button into the N.O. contact position for the delivery of cocaine. Next time we’ll revisit the subject of ladder diagrams and see how they are used to denote the paths of electric relays. ____________________________________________ |


Industrial Control Basics – Electric Relay Operation
Monday, January 9th, 2012| It’s a dark and stormy night and you’ve come to the proverbial fork in the road. The plot is about to take a twist as you’re forced to make a decision in this either/or scenario. As we’ll see in this article, an electric relay operates in much the same manner, although choices will be made in a forced mechanical environment, not a cerebral one.
When we discussed basic electric relays last week we talked about their resting in a so-called “normal state,” so designated by industrial control parlance. It’s the state in which no electric current is flowing through its wire coil, the coil being one of the major devices within a relay assembly. Using Figure 3 of my previous article as a general reference, in this normal state a relaxed spring keeps the armature touching the N.C. switch contact. While in this state, a continuous conductive path is created for electricity through to the N.C. point. It originates from the wire on the left side, which leads to the armature pivot point, travels through the armature and N.C. contact points, and finally dispenses through the wire at the right leading from the N.C. contact. Now let’s look at an alternate scenario, when current is made to flow through the coil. See Figure l, below.
Figure 1Figure 1 shows the path of electric current as it flows through the wire coil, causing the coil and the steel core to which it’s attached to become magnetized. This magnetization is strong, attracting the steel armature and pulling it towards the steel core, thus overcoming the spring’s tension and its natural tendency to rest in a tension-free state. The magnetic attraction causes the armature to rotate about the pivot point until it comes to rest against the N.O. contact, thus creating an electrical path en route to the N.O. wire, on its way to whatever device it’s meant to energize. As long as current flows through the wire coil, its electromagnetic nature will attract the armature to it and contact will be maintained with the N.O. juncture. When current is made to flow through the wire coil, an air gap is created between the armature and the N.C. contact, and this prevents the flow of electric current through the N.C. contact area. Current is forced to follow the path to the N.O. contact only, effectively cutting off any other choice or fork in the road as to electrical path that may be followed. We can see that the main task of an electric relay is to switch current between two possible paths within a circuit, thereby directing its flow to one or the other. Next time we’ll examine a simple industrial control system and see how an electric relay can be engaged with the help of a pushbutton. ____________________________________________ |

Industrial Control Basics – Introduction to Electric Relays
Tuesday, January 3rd, 2012| I’ve always considered science to be cool. Back in the 5th grade I remember fondly leafing through my science textbook, eagerly anticipating our class performing the experiments, but we never did. For some reason my teacher never took the time to demonstrate any. Undeterred, I proceeded on my own.
I remember one experiment particularly well where I took a big steel nail and coiled wire around it. When I hooked a battery up to the wires, as shown in Figure 1 below, electric current flowed from the battery through the wire coil. This set up a magnetic field in the steel nail, thereby creating an electromagnet. My electromagnet was strong enough to pick up paper clips, and I took great pleasure in repeatedly picking them up, then watching them unattach and fall quickly away when the wires were disconnected from the battery. Figure 1
Little did I know then that the electromagnet I had created was similar to an important part found within electrical relays used in many industrial control systems. An example of one of these relays is shown in Figure 2. Figure 2
So, what’s in the little plastic cube? Well, a relay is basically an electric switch, similar to the ones we’ve discussed in the past few weeks, the major difference being that it is not operated directly by human hands. Rather, it’s operated by an electromagnet. Let’s see how this works by examining a basic electrical relay, as shown in Figure 3.
Figure 3
The diagram in Figure 3 shows a basic electric relay constructed of a steel core with a wire coil wrapped around it, similar to the electromagnet I constructed in my 5th grade experiment. If the coil’s wires are not hooked up to a power source, a battery for example, no electric current will flow through it. When there is no current the coil and steel core are not magnetic. For purposes of our illustration and in accordance with industrial control parlance, this is said to be this relay’s “normal state.” Next to the steel core there is a movable steel armature, a kind of lever, which is attached to a spring. On one end of the armature is a pivot point, on the other end is a set of electrical switch contacts. When the relay is in its normal state, the spring’s tension holds the armature against the “normally closed,” or N.C., contact. If electric current is applied to the wire leading to the pivot point on the armature while in this state, it will be caused to flow on a continuous path through the armature and the N.C. contact, then out through the wire leading from the N.C. contact. In our illustration, since the armature does not touch the N.O. contact, an air gap is created that prevents electric current from traveling through the contact from the armature. Next week we’ll see how these parts come into play within a relay when electric current flows through the coil, turning it into an electromagnet. ____________________________________________ |


Industrial Control Basics – Pushbuttons
Monday, December 26th, 2011| I always enjoy watching impatient people waiting for an elevator. They press the button, and if it doesn’t come within a few seconds they press it over and over again, as if this will hurry things up. In the end they must resign themselves to the fact that the elevator will operate in its own good time.
Pushbuttons, although simple in appearance like the big, red “Easy” button that’s featured in a certain business supply chain’s commercials, are actually complex behind the scenes. They perform important functions within the industrial control systems of a huge diversity of mechanized equipment. Last week we introduced ladder diagrams, used to design and document industrial control systems, and we’ll now see how they depict the action of pushbuttons within two commonly used industrial settings, the “normally open” and the “normally closed.”
Figure 1
Figure 1(a) shows a pushbutton hooked up to an electric motor. When no one is pressing it a spring in the pushbutton forces the button to rest in the up position, allowing an air gap to exist in the electrical circuit between hot and neutral and preventing current from flowing. This type of switch is characterized as a “normally open” switch in industrial control terminology. In Figure 1(b) someone depresses the button, compressing its spring and closing the air gap, which allows current to flow and the motor to operate Figure 1(c) shows the ladder diagram version of 1(a). Now let’s take a look at Figure 2 to see a different type of pushbutton, one that’s characterized as “normally closed.”
|


Pressurized Containers – Industrial Overpressure Devices
Sunday, October 17th, 2010| Perhaps you went out on a drive to enjoy a nice summer day. As you ventured into uncharted territory, you might have ended up in an industrial area. There, you noticed factories, chemical plants, and oil refinery complexes, each surrounded by a huge system of pipes and tanks. You might have considered it to be an eyesore, but if you’re an artist and engineer like I am, you might look at it as a form of art, composed of interesting shapes, colors, and patterns. No matter how you look at it, you can bet that there are at least a few pressurized containers in there.
Last time we saw how something as seemingly harmless as a home water heater could become a dangerous missile if the pressure inside builds to the point where the tank ruptures. You can imagine what kind of explosive forces, steam, and chemicals would be unleashed into the surroundings if an industrial sized pressurized container failed due to overpressure. Let’s explore some other types of overpressure devices that are commonly used in industrial settings. One type of overpressure device is a safety valve. They are similar to a water heater relief valve, but they are generally used to relieve overpressure of gases and steam. How do they work? Basically, a safety valve is attached to the top of a pressurized container as shown in the cut away view in Figure 1 below.
Figure 1 – A Basic Safety Valve In The Closed Position A powerful spring in the valve body is designed to force down on the valve and keep it closed if there is normal pressure inside the container. Once the pressure begins to rise to an unsafe level, it pushes up against the valve and overcomes the force of the spring. The valve opens, as shown in Figure 2 below, and the contents of the pressurized container are safely vented out to an area that is normally unoccupied by people. In case you’re wondering, safety valves are commonly used on pressurized storage tanks and boilers.
Figure 2 – A Basic Safety Valve In The Open Position Another way to address the overpressure scenario is to employ a rupture disc. This is in fact a purposely constructed weak spot. It is intentionally built into a pressurized container and is designed so that it will fail when pressure starts to rise. In fact, this disc is designed to fail at a pressure point just below the pressure at which the container itself would fail. The disc is usually located within a vent pipe, which is in turn connected to the container. Should the disc rupture in an overpressure situation, the contents of the pressurized container will safely flow out of the vent pipe to a place normally unoccupied by people. The advantage of using a rupture disc is that they are made to safely release huge quantities of pressurized substances very quickly. The disadvantage in their usage is that they’re a one-time fix. That is, unlike relief or safety valves which may perform their function a multitude of times, a rupture disc is destroyed once it does its job. They are generally used in industrial settings where potential hazards are greater than at home, so once the rupture disc blows, the complete system generally undergoes a shut down so that the disc an be replaced before the pressurized container can be used again. Another option to pressure containment is the use of a fusible plug, usually constructed of a metal that will melt if the temperature within a pressurized container rises above a certain level. The metal plug melts, and excess pressure is vented through the aperture formed into a safe location. These are often used on locomotive boilers and compressed gas cylinders. Like rupture discs, fusible plugs are a one-time fix and must be replaced once they have done their job. Yet another option to pressure containment is to use a temperature limiting control. This category includes devices that monitor temperature and pressure within a pressurized container. If a dangerous situation should develop, the control system reacts, effectively reducing the pressure to prevent failure of the vessel. Automatic combustion control systems for boilers in electric utility power plants use temperature and pressure sensors to keep pressures within safe limits by regulating fuel and air input to the boiler. Next time we’ll cover the American Society of Mechanical Engineers (ASME) Boiler and Pressure Vessel Code (BPVC), which establishes rules governing the design, fabrication, testing, inspection, and repair of boilers and other pressurized containers. _____________________________________________ |


