Archive for the ‘power plant training’ Category
Wednesday, February 21st, 2018
|
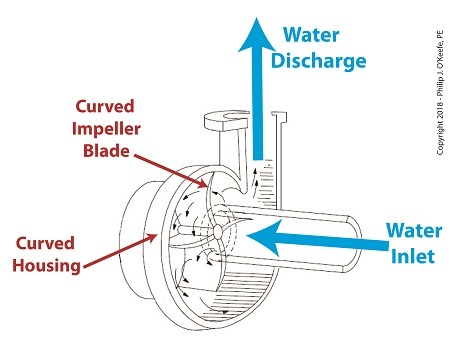
Last time we learned how centrifugal pumps can create a low pressure environment at the pump’s inlet, which can allow water inside the pump to boil at temperatures far lower than normal. Ultimately, this results in the formation of tiny but destructive cavitation bubbles. Today we’ll see how a centrifugal pump’s curved features are key to its functionality.
A Centrifugal Pump’s Curved Features are Key to Functionality
Even a casual glance at a centrifugal pump will disclose its many curved features. As the illustration shows, both the housing and internal impeller blades, are curved. These curves are known as volutes. The volutes’ dimensions are mathematically generated by engineers to facilitate the precise flow of water from inlet to discharge by way of the pump’s impeller blades.
Next time we’ll see how a centrifugal pump is home to both low and high water pressure, creating a volatile environment in which cavitation bubbles form and collapse.
opyright 2018 – Philip J. O’Keefe, PE
Engineering Expert Witness Blog
____________________________________ |
Tags: cavitation, centrifugal pump, engineering, flow, housing, impeller blades, volute
Posted in Engineering and Science, Expert Witness, Forensic Engineering, Innovation and Intellectual Property, Personal Injury, power plant training, Product Liability | Comments Off on A Centrifugal Pump’s Curved Features are Key to Functionality
Thursday, February 8th, 2018
|
Last time we performed an engineering experiment that demonstrated how we can lower the boiling point of water inside a lidded pot without applying heat if we use a vacuum pump to lower the pot’s internal pressure. We discovered that when pressure was lowered to 0.25 pounds per square inch (PSI), the water inside the pot turned to steam at a mere 59ºF, which initiated the cavitation process. Today we’ll see how centrifugal pumps can also create vacuums to initiate cavitation.

Centrifugal Pumps Can Create Vacuums
As we learned in a past blog, centrifugal pumps contain rotating impellers within a housing called a volute. This housing has an inlet, known as an eye, where water flows into the pump from a pipe, and an outlet, known as a discharge, where water flows out of the pump. The centrifugal pump creates a vacuum by mimicking the action of sucking soda through a straw. The spinning impeller draws water into the housing by creating low pressure at the inlet, and if the pressure gets low enough, we’ll recreate what happened in our vacuum pump and pot experiment. Water will boil at temps far lower than normal boiling point of 212 ºF. Just as in our experiment, if pressure is lowered to 0.23 PSI, water present at the pump inlet will boil at 59ºF, causing thousands of tiny steam bubbles to form and the pump to cavitate.
They’re just tiny bubbles, so what harm can they do? We’ll find out next time.
opyright 2018 – Philip J. O’Keefe, PE
Engineering Expert Witness Blog
____________________________________ |
Tags: boiling water, cavitation, centrifugal pump, engineering, low pressure, pump, vacuum
Posted in Engineering and Science, Expert Witness, Forensic Engineering, Innovation and Intellectual Property, power plant training, Product Liability | Comments Off on Centrifugal Pumps Can Create Vacuums
Sunday, January 28th, 2018
|
Last time we learned how the thermodynamic properties of water contribute to the phenomenon of cavitation, and how liquids exist in three states, solid, liquid, or vapor, depending on temperature and surrounding air pressure. Our example of an open pot of water being heated on a stove demonstrated that once water temperature rose above 212ºF, it changed to steam, which initiated the cavitation process. Today we’ll see how decreasing pressure contributes to cavitation.
How Decreasing Pressure Contributes to Cavitation
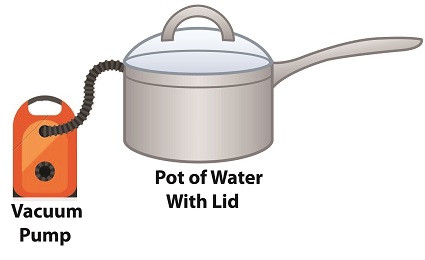
Cavitation can occur without a heat source. In our pot example, we can start the cavitation process by simply decreasing the pressure of the air resting on top of the water, thereby also decreasing the water’s pressure.
Normally atmospheric pressure on Earth exists at around 15 pounds per square inch (PSI). But if we introduce a vacuum pump to an enclosed space, we can create an internal pressure which is lower than the surrounding atmospheric pressure outside the pot. In other words, we create a vacuum. A vacuum is any air pressure lower than atmospheric pressure. This vacuum environment produces an entirely new set of circumstances under which cavitation can occur. In fact, creating a vacuum makes it possible to boil water without using any heat!
As we learned in a past blog on the different forms of heat energy, the boiling point of water varies depending on the location of the stovetop, whether it’s in a place of low altitude, like New Orleans, or higher altitude, like Denver. But if we apply a tight lid to the pot and isolate its internal atmosphere from surrounding atmospheric pressure, you create a closed environment. This allows us to manipulate the pot’s internal pressure. When we attach a vacuum pump to remove air, we reduce the air pressure bearing down on the water inside. With much of the air removed, pressure inside the pot drops below normal atmospheric pressure existing outside the pot, and we discover that at 0.25 PSI water turns to steam at a mere 59ºF and cavitation can begin. That’s right, you can boil water without using heat.
Next time we’ll apply our knowledge of water pressure and temperature to an industrial setting and see how cavitation occurs inside pumps.
opyright 2018 – Philip J. O’Keefe, PE
Engineering Expert Witness Blog
____________________________________ |
Tags: atmospheric pressure, cavitation, temperature, thermodynamics, vacuum
Posted in Engineering and Science, Expert Witness, Forensic Engineering, Innovation and Intellectual Property, Personal Injury, power plant training, Product Liability | Comments Off on How Decreasing Pressure Contributes to Cavitation
Monday, January 15th, 2018
|
Last time we introduced the phenomenon of cavitation, which simply stated is the rapid formation and collapse of vapor bubbles within liquids. It’s a destructive force that eats away at the metal parts of water pumps, used in power plants and other industrial settings. To understand how cavitation comes into play, we’ll explore a branch of engineering known as thermodynamics.
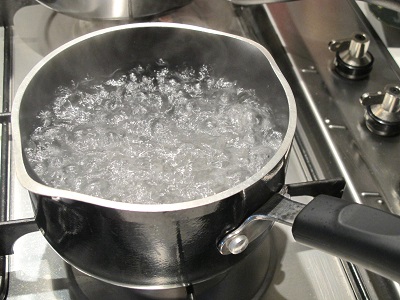
Cavitation doesn’t occur in a glass of water resting on a counter, but bring that water to a boil and the cavitation process will begin. That’s because cavitation is initiated when liquids change form from one physical state to another, in this case from a liquid to a vapor we commonly call steam. All liquids exist in three states, namely solid, liquid, and vapor, but in our thermodynamic analysis we’ll only consider two, liquid and vapor, because cavitation can’t occur in solids.
Thermodynamic Properties of Water and Cavitation
At normal atmospheric pressure of 15 pounds per square inch (PSI) which exists in the average kitchen, water remains in a liquid state between the temperatures of 32ºF and 212ºF. Above 212ºF water begins to boil, transforming into steam vapor. The state in which water exists depends on two thermodynamic properties, namely temperature and pressure. Change one of these variables and it affects the other, and thereby the conditions under which cavitation will occur.
We’ll take an in-depth look at this next time when we revisit the topics of pressurization and vacuums.
opyright 2018 – Philip J. O’Keefe, PE
Engineering Expert Witness Blog
____________________________________ |
Tags: cavitation, engineering, power plants, pumps, states of water, thermodynamics
Posted in Engineering and Science, Expert Witness, Forensic Engineering, Innovation and Intellectual Property, Personal Injury, power plant training, Product Liability | Comments Off on Thermodynamic Properties of Water and Cavitation
Wednesday, January 3rd, 2018
|
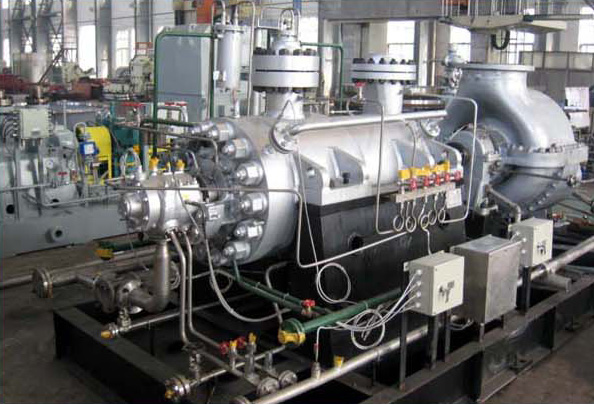
Shortly after I graduated with my engineering degree I worked as a power plant engineer at an electric utility. One day I was walking through the plant and heard a loud racket coming from the boiler feel pumps. These are the massive centrifugal pumps that deliver pressurized water to the boiler. The water is transformed into steam to drive steam turbines and spin electrical generators, which ultimately results in electrical power. The noise was so loud, it sounded like rocks were being ground up. I asked a coworker what was going on, and he replied matter-of-factly, “The pumps are cavitating.”
Boiler Feed Pumps Experience Cavitation
So what exactly is cavitation? We’ll find out next time when we explore the mechanics of this noisy phenomenon as it applies to boiler feed pumps and other centrifugal pumps.
opyright 2017 – Philip J. O’Keefe, PE
Engineering Expert Witness Blog
____________________________________ |
Tags: boiler, boiler feed pumps, cavitation, centrifugal pump, electric utility, electrical generator, engineering, power plant, steam turbine
Posted in Engineering and Science, Expert Witness, Forensic Engineering, Innovation and Intellectual Property, Personal Injury, power plant training, Product Liability | Comments Off on Boiler Feed Pumps Experience Cavitation
Monday, December 19th, 2016
Tags: engineering expert, engineering expert witness, pulleys
Posted in Courtroom Visual Aids, Engineering and Science, Expert Witness, Forensic Engineering, Innovation and Intellectual Property, Personal Injury, power plant training, Product Liability, Professional Malpractice | Comments Off on Pulleys Make Santa’s Job Easier
Thursday, December 10th, 2015
|
My work as an engineering expert has often required that I perform calculations to quantify the energy consumed by electric motors and steam turbines, such as when they work together at power plants to generate electricity. Today we’ll see how work and energy share an interesting relationship that is brought out by examining the units by which they are measured.
Last time we used de Coriolis’ formula to compute work to calculate the amount of work performed while pushing a loaded wheelbarrow a distance of 3 meters. We found that in order to move the wheelbarrow that distance, a gardener must exert a force equal to 534 Newton • meters of work. That relationship is shown here,
Work = 178 Newtons × 3 meters = 534 Newton • meters (1)

de Coriolis’ Formula to Compute Work
The Newton, as discussed previously in this blog series, is shorthand notation for metric units of force, and we’ll use those units today to demonstrate the special relationship between work and energy.
We’ll start by supposing that you’re unfamiliar with the Newton as a unit of measurement. In that case you’d have to employ longhand notation to quantify things, which means you’d be measuring units of force in terms of kilogram • meters per second2.
Putting equation (1) in longhand notation terms, we arrive at,
Work = 178 kilogram • meters per second2 × 3 meters (2)
Work = 534 kilogram • meters2 per second2 (3)
If you’ve been following along in this blog series, you’ll recognize that the unit of measurement used to compute work, namely, kilogram • meters2 per second2, is the same as was used previously to measure energy. That unit is the Joule, which is considerably less wordy.
Equations (2) and (3) bear out the interesting relationship between work and energy — they share the same unit of measure. This relationship would not be apparent if we only considered the units for work presented in equation (1).
So following standard engineering convention where work and energy are expressed in the same units, the work required to push the wheelbarrow is expressed as,
Work = 534 Joules
Yes, work and energy are measured by the same unit, the Joule. But, energy isn’t the same as work. Energy is distinguished from work in that it’s the measure of the ability to perform work. Stated another way, work cannot be performed unless there is energy available to do it, just as when you eat it provides more than mere pleasure, it provides your body with the energy required to perform the work of pushing a wheelbarrow through the garden.
Next time we’ll see how work factors into the Work Energy Theorem, which mathematically relates work to energy.
Copyright 2015 – Philip J. O’Keefe, PE
Engineering Expert Witness Blog
____________________________________ |
Tags: de Coriolis' formula to compute work, electric motors, energy, engineering expert, generate electricity, joule, Newton meters, Newtons, power plants, steam turbines, unit of energy, units of force, work, work energy relationship, work required
Posted in Engineering and Science, Expert Witness, Forensic Engineering, Innovation and Intellectual Property, Personal Injury, power plant training, Product Liability | Comments Off on Work and Energy Share an Interesting Relationship
Tuesday, November 3rd, 2015
|
When acting as an engineering expert I’m often called upon to investigate incidents where energy converts from one form to another, a phenomenon that James Prescott Joule observed when he built his apparatus and performed his experiments with electricity. Today we’ll apply Joule’s findings to our own experiment with a coffee mug when we convert its kinetic energy into electrical energy and see how the units used to express that energy also change.
We had previously calculated the kinetic energy contained within our falling coffee mug to be 4.9 kg • meter2/second2, also known as 4.9 Joules of energy, by using de Coriolis’ Kinetic Energy Formula. Now most of us don’t speak in terms of Joules of energy, but that’s easily addressed. As we learned in a previous blog on The Law of Conservation of Energy, all forms of energy are equivalent and energy can be converted from one form to another, and when it does, the unit of energy used to express it also changes.
Let’s say we want to put our mug’s 4.9 Joules of kinetic energy to good use and power an electric light bulb. First we must first find a way of converting the mug’s kinetic energy into electrical energy. To do so, we’ll combine Joule’s apparatus with his dynamo, and connect the mug to this hybrid device with a string.
![]() 
Converting Kinetic Energy to Electrical Energy
As the mug falls its weight tugs on the string, causing the winding drum to rotate. When the drum rotates, the dynamo’s magnet spins, creating electrical energy. That’s right, all that’s required to produce electricity is a spinning magnet and coils of wire, as explained in my previous blog, Coal Power Plant Fundamentals – The Generator.
Now we’ll connect a 5 Watt bulb to the dynamo’s external wires. The Watt is a unit of electrical energy named in honor of James Watt, a pioneer in the development of steam engines in the late 18th Century.
Now it just so happens that 1 Watt of electricity is equal to 1 Joule of energy per a specified period of time, say a second. This relationship is expressed as Watt • second. Stated another way, 4.9 Joules converts to 4.9 Watt • seconds of electrical energy. Let’s see how long we can keep that 5 Watt bulb lit with this amount of energy. Mathematically this is expressed as,
Lighting Time = (4.9 Watt • seconds) ÷ (5 Watts) = 0.98 seconds
This means that if the mug’s kinetic energy was totally converted into electrical energy, it would provide enough power to light a 5 Watt bulb for almost 1 second.
Next time we’ll see what happens to the 4.9 Joules of kinetic energy in our coffee mug when it hits the floor and becomes yet another form of energy.
Copyright 2015 – Philip J. O’Keefe, PE
Engineering Expert Witness Blog
____________________________________ |
Tags: coils of wire, dynamo, electrical energy, engineering, engineering expert, James Prescott Joule, James Watt, joule, kinetic energy, magnet, power, watt seconds, wires
Posted in Engineering and Science, Innovation and Intellectual Property, power plant training | Comments Off on Converting Kinetic Energy to Electrical Energy
Saturday, October 24th, 2015
|
As an engineering expert with 14 years’ electric utility experience, I’ve dealt with all types of electrical power generators, including many similar to the dynamo that James Prescott Joule used in his Experiment With Electricity. Today we’ll look inside Joule’s dynamo and see how it contributed to creating electricity as well as another of Joule’s discoveries, the Joule Heating Effect.

Dynamo-Circa Early 19th Century
In Joule’s Experiment With Electricity, the dynamo was powered by a steam engine, which enabled the dynamo’s shaft to spin. As it spun, the magnet located inside the dynamo also spun, thus creating a rotating magnetic field that surrounded the dynamo’s internal copper wire coils.
The interaction between the magnetic field and wire produced electric current which flowed inside the coils. The current ultimately made its way out of the dynamo by way of external wires, to which any number of devices could be powered when attached. The net result was the engine’s mechanical energy had been converted into electrical. To learn more about the process of producing electricity with magnets see my blog on, Coal Power Plant Fundamentals – The Generator.
As electrical energy flowed through the dynamo’s wiring, some of it was converted into heat energy. This was due to resistance posed by impurities present in the makeup of the wire, impurities which served to impede the overall flow of electric current. When electrons flowing through the wire collided with these impediments, they caused heat to build up inside the wire, a phenomenon which came to be known as the Joule Heating Effect. To read more on electrical resistance and Joule heating go to my blog, Wire Size and Electric Current.
The net result of Joule’s Experiment With Electricity was to further prove the link between chemical, heat, mechanical and electrical energies as set out in the Law of Conservation of Energy. And I suspect that knowledge was later put to use by Joule’s family for the betterment of their brewery business.
Next time we’ll use Joule’s experimental findings in conjunction with de Coriolis’ Kinetic Energy Formula to quantify the energy of the falling coffee mug we’ve been watching.
Copyright 2015 – Philip J. O’Keefe, PE
Engineering Expert Witness Blog
____________________________________ |
Tags: de Coriolis, dynamo, electric utility, electrical energy, electrical power generators, electrical resistance, engineering expert, heat energy, James Prescott Joule, Joule heating, Joule's experiment with electricity, law of conservation of energy, power plant, wire size and electric current
Posted in Engineering and Science, Expert Witness, Forensic Engineering, Innovation and Intellectual Property, Personal Injury, power plant training, Product Liability | Comments Off on Joule’s Dynamo – The Joule Heating Effect
Friday, October 16th, 2015
|
In my work as an engineering expert I’ve dealt with all forms of energy, just as we’ve watched James Prescott Joule do. He constructed his Joule Apparatus specifically to demonstrate the connection between different forms of energy. Today we’ll see how he furthered his discoveries by building a prototype power plant capable of producing electricity, a device which came to be known as Joule’s Experiment With Electricity.

Joule’s Experiment With Electricity
As the son of a wealthy brewer, Joule had been fascinated by electricity and the possibility of using it to power his family’s brewery and thereby boost production. To explore the possibilities, he went beyond the Apparatus he had built earlier and built a device which utilized electricity to power its components. The setup for Joule’s experiment with electricity is shown here.
Coal was used to bring water inside a boiler to boiling point, which produced steam. The steam’s heat energy then flowed to a steam engine, which in turn spun a dynamo, a type of electrical generator.
Tracing the device’s energy conversions back to their roots, we see that chemical energy contained within coal was converted into heat energy when the coal was burned. Heat energy from the burning coal caused the water inside the boiler to rise, producing steam. The steam, which contained abundant amounts of heat energy, was supplied to a steam engine, which then converted the steam’s heat energy into mechanical energy to set the engine’s parts into motion. The engine’s moving parts were coupled to a dynamo by a drive belt, which in turn caused the dynamo to spin.
Next time we’ll take a look inside the dynamo and see how it created electricity and led to another of Joule’s discoveries being named after him.
Copyright 2015 – Philip J. O’Keefe, PE
Engineering Expert Witness Blog
____________________________________ |
Tags: boiler expert witness, dynamo, electric current, electric current induction, electrical energy, electrical engineering expert witness, electrical generator expert witness, electrical resistance of wires, engineering expert witness, forensic engineer, heat energy, James Prescott Joule, Joule Heating Effect, magnetic field, mechanical energy, mechanical engineering expert witness, power engineering expert witness, power plant, power plant engineering expert witness, steam, wire size
Posted in Engineering and Science, Expert Witness, Forensic Engineering, Innovation and Intellectual Property, Personal Injury, power plant training, Product Liability | Comments Off on Joule’s Experiment With Electricity


