| My first car was a used 1963 Dodge 880. It was reliable for the most part, but one day when I stepped on the brake in a supermarket parking lot, nothing happened. I began to roll down an incline, and I struggled to steer around the maze of parked cars in the lot. After what seemed to be an eternity I managed to navigate my way out of the lot into an adjacent cornfield. The soft ground and corn stalks finally brought me to a stop. I later discovered that the reason my brakes failed is because their linings had completely worn away.
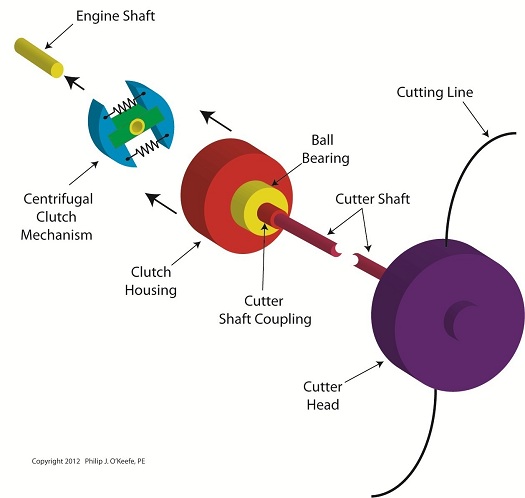
Like the brakes in cars, centrifugal clutch shoes also have linings as shown in Figure 1. Brake linings are typically made of a rough, high friction materials, such as ceramic compounds. These materials are bonded to the brake shoes, or in the case of clutches, to the clutch shoes. When centrifugal force comes into play, pressing the clutch shoes against the inside wall of the clutch housing, the roughness of the linings provides a good grip, preventing slippage between the shoes and the housing.
Figure 1
As we learned in previous articles, slip between the clutch shoes and clutch housings can create problems. In our grass trimmer for example, we learned that slippage reduces the amount of power the engine can effectively transmit to the cutter head. It also tends to produce a lot of heat. This heat can adversely effect the clutch springs and cause clutch failure. Although the high friction lining of the clutch shoes prevents most slippage, it can still occur, as when the throttle is depressed and engine speed increases beyond idle. There is some slipping as the clutch shoes first engage with the clutch housing, and it will continue until the engine speed increases to the point where centrifugal force causes the clutch shoes to firmly press into the clutch housing. Slippage also occurs when gasoline powered tools are subjected to operating stress. Figure 2 shows two views of a chainsaw. The first view is complete, the second shows the chain and clutch housing in isolation.
Figure 2
With the engine housing removed, we see that the saw chain is connected to a sprocket located on the centrifugal clutch housing. This sprocket is similar to those that engage the chains on bicycle wheels. Now suppose someone decides to use the chainsaw to cut a green, sap-filled log. To make matters worse, let’s suppose the chainsaw has a dull saw chain. If you’ve ever tried doing this, you know that the sticky, sappy wood will eventually gum up the chain and stop it from moving. Since the chain is connected to the clutch housing, it stops as well. However the clutch shoes, which are driven by the engine, keep trying to move the gummed-up clutch housing, because the engine’s power is enough to overcome some of the friction. The result is that the shoes slip uselessly inside the housing. Over time, continued slippage will cause the clutch shoes’ high friction lining to wear away. Once the lining is gone the clutch shoes will slip excessively, even when the gasoline powered tool is being employed to perform the lightest task. That’s because slipping prevents a good portion of the engine’s power from being transmitted to the cutting head. That’s it for our series on centrifugal clutches. Next we’ll be discussing transistors, how they’re used in electronic controls to switch things on and off and perform other functions. ____________________________________________ |
Posts Tagged ‘chainsaw’
Mechanical Power Transmission – Centrifugal Clutch Shoe Wear
Sunday, June 3rd, 2012

Industrial Control Basics – Disconnect Switches
Sunday, March 25th, 2012| Last week our kitchen ceiling fan and light combo decided to stop working. We don’t like eating in the dark, so I was compelled to do some immediate troubleshooting. As an engineer with training in the workings of electricity I have a great respect for it. I’m well aware of potential hazards, and I took a necessary precaution before taking things apart and disconnecting wires. I made the long haul down the stairs to the basement, opened the circuit breaker in the electrical panel, and disabled the flow of electricity to the kitchen. My fears of potential electrocution having been eliminated, my only remaining fear was of tumbling off the ladder while servicing the fan.
Just as I took the precaution to disconnect the power supply before performing electrical maintenance in my home, workers in industrial settings must do the same, and a chief player in those scenarios is the motor overload relay discussed last week. It automatically shuts down electric motors when they become overheated. Let’s revisit that example now.
Figure 1
Our diagram in Figure 1 shows electric current flowing through the circuit by way of the red path. Even if this line were shut down, current would continue to flow along the path, because there is no means to disconnect the entire control system from the hot and neutral lines supplying power to it, that is, it is missing disconnect switches. Electric current will continue to pose a threat to workers were they to attempt a repair to the system. Now let’s see how we can eliminate potential hazards on the line.
Figure 2
In Figure 2 there is an obvious absence of the color red, indicating the lack of current within the system. We accomplished this with the addition of disconnect switches capable of isolating the motor control circuitry, thereby cutting off the hot and neutral lines of the electrical power supply and along with it the unencumbered flow of electricity. These switches are basically the same as those seen in earlier diagrams in our series on industrial controls, the difference here is that the two switches are tied together by an insulated mechanical link. This link causes them to open and close at the same time. The switches are opened and closed manually via a handle. When the disconnect switches are both open electricity can’t flow and nothing can operate. Under these conditions there is no risk of a worker coming along and accidentally starting the conveyor motor. To add yet another level of safety, disconnect switches are often tagged and locked once de-energized. This prevents workers from mistakenly closing them and starting the conveyor while maintenance is being performed. Brightly colored tags alert everyone that maintenance is taking place and the switches must not be closed. The lock that performs this safety function is actually a padlock. It’s inserted through a hole in the switch handle, making it impossible for anyone to flip the switch. Tags and locks are usually placed on switches by maintenance personnel before repairs begin and are removed when work is completed. Now let’s see how our example control system looks in ladder diagram format.
Figure 3
Figure 3 shows a ladder diagram that includes disconnect switches, an emergency stop button, and the motor overload relay contacts. The insulated mechanical link between the two switches is represented by a dashed line. Oddly enough, engineering convention has it that the motor overload relay heater is typically not shown in a ladder diagram, therefore it is not represented here. This wraps up our series on industrial control. Next time we’ll begin a discussion on mechanical clutches and how they’re used to transmit power from gasoline engines to tools like chainsaws and grass trimmers. ____________________________________________
|


