| Ever wonder why the burger you get at your favorite fast food chain never looks like the one on TV? The bun isn’t fluffy, the beef patty doesn’t make it to the edges, and the lettuce is anything but crisp. Well, it’s because a professional known as a Food Stylist, working together with a professional marketing firm and production crew, has painstakingly created the beautiful, bright and balanced burger used to lure you in. The process can take days or even weeks to create and has nothing to do with reality. The burger you’re really going to get will look more like a gorilla sat on it.
Many of the same issues must be dealt with when mass producing food. Chances are human hands will never even touch the product, like they did when creating the prototype in the test kitchen. In the world of food manufacturing, the “look” part can be extremely challenging. How do you get machines and production lines to create visually appealing food that entices prospective buyers to make an investment in it? How do you get it to taste good, or at least acceptable to the palate? The “taste” part of food manufacturing can be even more challenging. For example, in the test kitchen of a pastry product manufacturer, a recipe will be developed using home pantry products like flour, butter, and eggs. Ever made bread or a pie crust? The stickiness factor is enough to drive many insane. Even nimble human fingers have a hard time dealing with it. Now enter food processing machinery and conveyor belts into the scenario. This brings the possibility of stickiness to a whole new level. Huge messes that gum up the machinery are common, and production line shutdowns are the result. When faced with these challenges, plant engineers have to work closely with chefs in the R&D kitchen to come up with some sort of compromise in the recipe or final form of the food product. The goal is to cost effectively produce food products acceptable to consumers for purchase, and it’s often an iterative process involving many successive changes to recipes and equipment designs, coupled with a lot of testing and retesting, before success is finally met. If testing ultimately proves that the product appeals to consumers’ tastes and flows nicely through production lines, then there’s a good chance it will be a commercial success. In any case, cost is the dictating factor as to whether the food product will successfully make it onto the shelves of your supermarket. A margin of profit must be made. But this success is only part of the design process. Before full commercial production can commence, processing equipment and production lines must be designed so that they:
Next time we’ll explore how cleanliness requirements factor into food manufacturing equipment design. ____________________________________________
|
Archive for September, 2011
Food Manufacturing Challenges – Look and Taste
Sunday, September 25th, 2011
Food Manufacturing Challenges
Sunday, September 18th, 2011| Some people just have a knack in the kitchen, and my wife is among them. She transforms raw ingredients into the most amazing culinary delights, almost like she’s waving a magic wand. The finished products are works of art, hand crafted with tender loving care, and lucky me, I get to feast on them regularly!
During the course of my engineering career I’ve been employed within many industries, and at one point I made the decision to leave the electric utility industry and enter into the world of food manufacturing. I accepted the position of Plant Engineer with a wholesale manufacturer of baking ingredients and frozen pastry products. My main responsibility was the design of food manufacturing equipment and their production lines. What I had expected to be a relatively straightforward process soon proved to be more challenging. I was no longer working with hard metal as my raw material, that is, gears, nuts, and bolts, but a whole new arena of things described by adjectives such as gooey and pastey. Engineers don’t typically create food products, and let’s face it, you probably wouldn’t want to eat anything that I cooked anyway! But an engineer working within a food manufacturing plant must act as a liaison between the worlds of engineering design and the culinary arts. Now food manufacturers typically hire professional chefs to develop new products in their research and development (R&D) kitchens. Like my wife, they’re well qualified to produce wonderful hand-made culinary delights. The sticky part comes in when their small batch recipes and preparation techniques don’t translate smoothly to the world of mass production. When it comes to handling food, human fingers are far superior to metal machinery, and raw ingredients behave differently for each. Herein lies much of the challenge for design engineers within the food industry. How do you design equipment and production lines to make huge quantities of food that look and taste as good as the prototype products made by hand in the R&D kitchen? Next week we’ll find out. ____________________________________________
|

Further Inside the Wall Wart
Sunday, September 11th, 2011| What do wall warts, aka AC wall adapters, and microwave ovens have in common? Well, in previous blogs discussing microwaves, we saw how a microwave oven’s high voltage circuitry uses a transformer, diode, and capacitor to effectively convert AC voltage into DC voltage. Wall warts do much the same thing and in very much the same way.
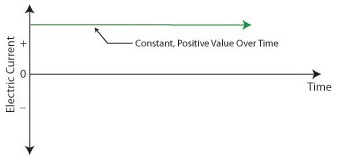
If you will recall from our discussion of microwave ovens in the past few weeks, the transformer in a high voltage circuit transforms 120 volts into a much higher voltage, say 4000 volts, in order to make things work. The diode and capacitor within both the microwave and the wall wart are key to facilitating this magical act, but in the wall wart it happens at a much lower voltage, about 12 volts. Last week we began exploring the inner workings of the wall wart. We discovered how its transformer converts the 120 volts emanating from your average wall outlet to the 12 volts required by most electronic devices. These voltages are shown at Points A and B in Figure 1 below. The fact that the voltage being put out results in waves of energy which alternate between a positive maximum value, zero, and a negative maximum value, makes it an unacceptable power source for most electronic devices. They require voltage that doesn’t alternate, and this is where the wall wart’s diode bridge and capacitor come into play.
Figure 1 – The Workings of the Wall Wart Transformer The wall wart’s diode bridge consists of four electronic components, namely the diodes, which are connected together. This diode bridge goes a bit further than the single diode present in a microwave oven, because it doesn’t merely eliminate negative aspects of alternating voltage. It actually transforms negative voltage into positive voltage. The result is a series of 12 volt peaks as shown at Point C of Figure 1. In fact, we end up with twice as many voltage peaks, and this is important, as you’ll see below. We still have the problem of zero voltage gaps to address. You see, over time the voltage at Point C of Figure 1 keeps changing between 0 volts and positive 12 volts. This can lead to problems, because many electronic devices require a consistent voltage of greater than zero to operate properly. For example, a light emitting diode (LED) might develop an annoying flicker, or you might end up hearing an irritating hum while listening to the radio. These annoyances are virtually eliminated by feeding voltage from the diode bridge into the capacitor, which gets rid of the zero voltage gaps between the voltage peaks. Like a microwave’s capacitor, the one within a wall wart charges up with electrical energy as the voltage from the diode bridge nears the top of a peak. Then, as voltage begins its dive back to a zero value, the capacitor discharges its electrical energy to fill in the gaps between peaks. The result is the rippled voltage pattern at Point D of Figure 1. With the gaps filled in, the voltage is at, or close enough to, the 12 volts required to keep an electronic device operating properly when it is connected to the wall wart’s low voltage power cord. Well, that’s it for our look at the wall warts that power our myriad of electronic devices. Next time we’ll switch to a totally topic and look at some of the basics of food manufacturing equipment design. ____________________________________________ |

Inside The Wall Wart
Monday, September 5th, 2011|
What would a cop show be without a crime scene, or better yet the obligatory dissection at the morgue? Forensic doctors performing autopsies have become commonplace, the clues they provide indispensable. Forensic engineers such as myself do much of the same thing, working our way backwards through time by dissecting industrial equipment and consumer products left in the wake of fires, injuries, and deaths. Let’s do some forensic dissecting now to see what’s in a wall wart and how it works. The inside of a basic wall wart is shown in Figure 1.
Figure 1 – Inside The Wall Wart You’ll note that a wall wart has four main components: a transformer, diode bridge, capacitor, and a printed circuit board (PCB). The PCB is constructed of plastic resin upon which is mounted copper strips. This makes a rigid platform base upon which electronic components are attached, namely the transformer, diode bridge, and capacitor. These components are soldered to the PCB, tying them together both mechanically and electrically. Now let’s see how the components of the wall wart work together to change the 120 volts coming from your standard wall outlet into the 12 volts needed to power a typical electronic device. We’ll use an instrument known as an oscilloscope to help us visualize what’s going on. See Figure 2.
Figure 2 – The Workings of the Wall Wart Transformer What is depicted in the graph above is the oscilloscope’s ability to receive an electronic signal, measure it, graph it, and then display it on a screen. This enables us to see how the signal changes over time. At Point A, which represents the wall wart plugged into a wall outlet, the voltage alternates between positive 120 volts and negative 120 volts upon entering the wall wart, which will now act as a transformer. The wall wart transformer then does as its name suggests, it transforms the 120 volts coming from the outlet into the 12 volts shown at Point B. You will note that this lower voltage also alternates between positive and negative values, just as the original 120 volts emanating from the wall outlet did. In one of my earlier blogs I explained that transformers only work when the electricity passing through them alternates over time. (Click here for a refresher: Transformers ) High voltage alternating electricity in one transformer coil creates magnetic fields that induce alternating electricity at a different voltage in a second transformer coil. So when you put alternating voltage into the transformer, you get alternating voltage out. But that’s not the end of the story. Many electronic devices operate on voltage that doesn’t alternate. What then? Will our handy wall wart still be able to bridge the electrical gap to fill our needs? Next time we’ll see how the diode bridge and capacitor come into play to deal with the alternating voltage from the transformer in a manner eerily similar to a microwave oven’s high voltage circuit. ____________________________________________ |


