Posts Tagged ‘machinery’
Friday, December 15th, 2017
|
Last time, we learned that a crankshaft is an engineering device which converts the reciprocating linear motion of an engine’s back-and-forth moving piston into the rotary motion that powers externally attached machinery. Its movement is shown here,
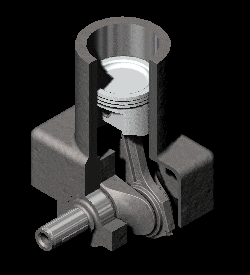
A Crankshaft in Motion
We’ll see how a crankshaft and piston’s motion benefits by the use of a flywheel next time.
opyright 2017 – Philip J. O’Keefe, PE
Engineering Expert Witness Blog
____________________________________ |
Tags: crankshaft, cylinder, engine, engineering, flywheel, machinery, piston, reciprocating linear motion, rotary motion
Posted in Engineering and Science, Expert Witness, Forensic Engineering, Innovation and Intellectual Property, Personal Injury, Product Liability | Comments Off on A Crankshaft in Motion
Friday, September 18th, 2015
|
Last time we introduced kinetic energy as the energy of movement. Today we’ll see how to calculate it, using French mathematician Gaspard-Gustave de Coriolis’ formula as set out in his textbook, Calculation of the Effect of Machines. We’ll then apply his formula to our example of a coffee mug falling from its shelf.
Gaspard-Gustave de Coriolis’ book presented physics concepts, specifically the study of mechanics, in an accessible manner, without a lot of highbrow theory and complicated mathematics. His insights made complicated subjects easy to understand, and they were immediately put to use by engineers of his time, who were busily designing mechanical devices like steam engines during the early stages of the Industrial Revolution.
Within its pages the mathematics of kinetic energy was presented in the scientific form that persists to present day. That formula is,
KE = ½ × m × v2
where m is the moving object’s mass and v its velocity.
In the case of our coffee mug, its kinetic energy will be zero so long as it remains motionless on the shelf. A human arm had lifted it to its perch against the force of gravity, thereby investing it with gravitational potential energy. If the mug was sent freefalling to the ground by the mischievous kitty, its latent potential energy would be realized and converted into the kinetic energy of motion.

To illustrate, let’s say a mug with a mass equal to 0.25 kg rests on a shelf 2 meters above the floor. Its potential energy would then be equal to 4.9 kg • meter2/second2, as was computed in our previous blog, Computing Potential Energy.
Once kitty nudges the mug from its perch and it begins to fall, its latent gravitational potential energy begins a conversion process from potential to kinetic energy. It will continue to convert into an amount of kinetic energy that’s precisely equal to the mug’s potential energy while at rest on the shelf, that is, 4.9 kg • meter2/second2. Upon impact with the floor, all the mug’s gravitational potential energy will have been converted into kinetic energy.
Next time we’ll apply the Law of Conservation of Energy to the potential and kinetic energy formulas to calculate the mug’s velocity as it freefalls to the floor.
Copyright 2015 – Philip J. O’Keefe, PE
Engineering Expert Witness Blog
____________________________________
|
Tags: Calculation of the Effect of Machines, engineering expert witness, engines, falling objects, Gaspard-Gustave de Coriolis, kinetic energy, machinery, mass, mechanical energy, mechanical engineer, mechanics, physics, potential energy, velocity
Posted in Engineering and Science, Expert Witness, Forensic Engineering, Innovation and Intellectual Property, Personal Injury, Product Liability | Comments Off on Calculation of the Effect of Machines — How to Calculate Kinetic Energy
Tuesday, July 15th, 2014
| We’ve been discussing gear trains for some time now, and last time we posed the question: Why even bother using a gear train and performing complex computations to arrive at a desired torque for an application? Why not just use a bigger motor to start with? Today we’ll see why.
First, we must acknowledge that sometimes higher torque is achieved by simply using a more powerful motor. But sometimes this isn’t possible or practical.
To begin our discussion, we must first understand how torque is related to motor power, the amount of mechanical work a motor can perform. Torque is in fact a function of how much mechanical power a motor produces. In the United States motor power is typically measured in units of horsepower.
The following equation illustrates the relationship between torque, horsepower, and motor speed:
T = [HP ÷ n] × 63,025
where T is the motor shaft’s torque in units of inch-pounds, HP is the motor’s horsepower, and n is the speed of the motor shaft in revolutions per minute (RPM). The number 63,025 in the equation is a constant used to convert the units of horsepower and RPM into units of torque (inch pounds). This equation applies to all sources of mechanical power. Its versatility enables design engineers to easily determine if a mechanical power source can deliver the torque required to drive a particular piece of machinery.
The torque equation above tells us that in order to get a higher torque T for a given speed n, you’ll have to get a motor with a higher HP. Put another way, if your speed remains constant and you use a motor with higher horsepower, you’ll get more torque for your application simply by increasing the horsepower.
Next time we’ll plug numbers into our equation and see how it all works.
_______________________________________
|
Tags: electric motor, engineering expert witness, forensic engineer, gear train, horsepower, machinery, mechanical power, motor shaft, motor shaft torque, motor speed, torque
Posted in Engineering and Science, Expert Witness, Forensic Engineering, Innovation and Intellectual Property, Personal Injury, Product Liability, Professional Malpractice | Comments Off on The Relationship Between Torque and Horsepower
Tuesday, April 29th, 2014
|
We’ve been discussing torque and how it enables more power to be available to applications such as loosening tight nuts with a wrench. Now we’ll see how those same principles apply to another application, a simple gear train.
To review, the torque formula is,
Torque = Distance × Force × sin(ϴ)
where, Distance and Force are vector magnitudes and ϴ is the angle formed between them.

Referring to the gear train illustration above, we see that Force and Distance vectors are present, just as they had been in our previous wrench/nut example. But instead of torque being created by way of force that’s applied to a wrench, things are reversed, and it’s the torque that creates the force.
You see, in the wrench/nut example, the force applied to the wrench handle created torque on the nut. In our present gear train example, the torque applied to the motor shaft is created by an electric motor exerting pressure upon the motor shaft, which in turn exerts a force upon the driving gear teeth. The driving gear is also attached to this shaft, so torque causes the driving gear to rotate along with the motor. This rotation results in a force being exerted at the point where the teeth of the driving gear mesh with the teeth of the driven gear. In other words, in the wrench/nut example force created torque, while in the present example torque creates a force.
The gear train has a pivot point, as there was in our wrench/nut example, but this time it’s located at the center of the motor shaft rather than at the center of a nut. The pivot point in both examples is where the action takes place. The motor’s shaft and driving gear rotate around it, just as the wrench jaws and handle rotated around the nut’s pivot point.
In both examples, the Distance vectors extend out from the pivot points to meet up with the Force vector’s path. In the gear train example, this Force vector path is called a line of action, as introduced earlier in this blog series. This line of action passes through to the point where the driving and driven gear teeth mesh. The force acting upon that point causes the gears in the gear train to rotate, and as they turn mechanical energy is transferred from the motor to whatever machinery component is attached to the shaft of the driven gear. The powered component will then be able to perform useful work such as cutting lumber, mixing frosting for a cake, drilling holes in steel, or propelling vehicles.
You will note that there is an angle ϴ which exists between the Distance and Force vectors. Since we have a pivot point, a Force vector, a Distance vector, and an angle ϴ, we are able to apply the torque formula to gear trains exactly as we did in our wrench/nut example. We can then use that formula to calculate how torque is transmitted between gears in the train.
Next time we’ll examine the distance and force vectors in a simple gear train.
_______________________________________
|
Tags: distance vector, driven gear, driving gear, engineering expert witness, force, force vector, forensic engineer, gear expert witness, gear teeth, gear teeth mesh, gear train, line of action, machine design, machinery, mechanical design, mechanical energy, mechanical engineer, nut, pivot point, torque, torque formula, wrench
Posted in Engineering and Science, Expert Witness, Forensic Engineering, Innovation and Intellectual Property, Personal Injury, Product Liability | Comments Off on Torque and Force
Sunday, March 9th, 2014
|
Last time we saw how a gear reduction does as its name implies, reduces the speed of the driven gear with respect to the driving gear within a gear train. Today we’ll see how to work the problem in reverse, so to speak, by determining how many teeth a driven gear must have within a given gear train to operate at a particular desired revolutions per minute (RPM).
For our example we’ll use a gear train whose driving gear has 18 teeth. It’s mounted on an alternating current (AC) motor turning at 3600 (RPM). The equipment it’s attached to requires a speed of 1800 RPM to operate correctly. What number of teeth must the driven gear have in order to pull this off? If you’ve identified this to be a word problem, you’re correct.

Let’s first review the gear ratio formulas introduced in my previous two articles:
R = nDriving ÷ nDriven (1)
R = NDriven ÷ NDriving (2)
Our word problem provides us with enough information so that we’re able to use Formula (1) to calculate the gear ratio required:
R = nDriving ÷ nDriven = 3600 RPM ÷ 1800 RPM = 2
This equation tells us that to reduce the speed of the 3600 RPM motor to the required 1800 RPM, we need a gear train with a gear ratio of 2:1. Stated another way, for every two revolutions of the driving gear, we must have one revolution of the driven gear.
Now that we know the required gear ratio, R, we can use Formula (2) to determine how many teeth the driven gear must have to turn at the required 1800 RPM:
R = 2 = NDriven ÷ NDriving
2 = NDriven ÷ 18 Teeth
NDriven = 2 × 18 Teeth = 36 Teeth
The driven gear requires 36 teeth to allow the gear train to operate equipment properly, that is to say, enable the gear train it’s attached to provide a speed reduction of 1800 RPM, down from the 3600 RPM that is being put out from the driving gear.
But gear ratio isn’t just about changing speeds of the driven gear relative to the driving gear. Next time we’ll see how it works together with the concept of torque, thus enabling small motors to do big jobs.
_______________________________________
|
Tags: AC motor, alternating current, driven gear, driving gear, electric motor, engineering expert witness, gear ratio, gear reduction, gear speed, gear teeth, gear train, licensed mechanical engineer, licensed professional engineer, machine design engineer, machine design expert witness, machine part, machinery, mechanical engineer, mechanism, PE, RPM, speed reduction, torque
Posted in Engineering and Science, Expert Witness, Forensic Engineering, Innovation and Intellectual Property, Personal Injury, Product Liability | Comments Off on Gear Reduction Worked Backwards
Monday, October 14th, 2013
|
We’ve been discussing various aspects of a power plant’s water-to-steam cycle, from machinery specifics to identifying inefficiencies, and today we’ll do more of the same by introducing the condenser hot well and discussing its importance as a key contributor to the conservation of energy, specifically heat energy. Let’s start by returning our attention to the steam inside the condenser vessel.
Last week we traced the path of the condenser’s tubes and learned that the cool water contained within them serve to regulate the steam’s temperature surrounding them so that temperatures don’t rise dangerously high. To fully understand the important result of this dynamic we have to revisit the concept of latent heat energy explored in a previous article. More specifically, how this energy factors into the transformation of water into steam and vice versa.
Steam entering the condenser from the steam turbine contains latent heat energy that was added earlier in the water/steam cycle by the boiler. This steam enters the condenser just above the boiling point of water, and it will give up all of its latent heat energy due to its attraction to the cool water inside the condenser tubes. This initiates the process of condensation, and water droplets form on the exterior surfaces of the tubes.

The water droplets fall like rain from the tube surfaces into the hot well situated at the bottom of the condenser. This hot well is essentially a large basin that serves as a collection point for the condensed water, otherwise known as condensate.
It’s important to collect the condensate in the hot well and not just empty it back into the lake, because condensate is water that has already undergone the process of purification. It’s been made to pass through a water treatment plant prior to being put to use in the boiler, and that purified water took both time and energy to create. The purified condensate also contains a lot of sensible heat energy which was added by the boiler to raise the water temperature to boiling point, as we learned in another previous article. This heat energy was produced by the burning of expensive fuels, such as coal, oil, or natural gas.
So it’s clear that the condensate collecting in the hot well has already had a lot of energy put into it, energy we don’t want to lose, and that’s why its an integral part of the water-to-steam setup. It acts as a reservoir, and the drain in its bottom allows the condensate to flow from the condenser, then follow a path to the boiler, where it will be recycled and put to renewed use within the power plant.
Next week we’ll follow that path to see how the condensate’s residual heat energy is put to good use.
________________________________________ |
Tags: boiler, boiling point, coal, coal fired boiler, condensate, condensed water, condenser, drain, electric utility power plant, engineering expert witness, forensic engineer, fuel, heat energy, hot well, latent heat energy, licensed professional engineer, machinery, mechanical engineer, natural gas, oil, power engineer, power plant engineer, power plant training seminars, purified water, residual heat energy, sensible heat energy, steam turbine, water droplets, water temperature, water treatment plant, water-to-steam cycle
Posted in Engineering and Science, Expert Witness, Forensic Engineering, Innovation and Intellectual Property, Personal Injury, power plant training, Product Liability | Comments Off on How A Power Plant Condenser Works, Part 3
Sunday, March 31st, 2013
|
While pursuing my engineering degree my professors provided me with a thorough understanding of mechanical and electrical design and instruction on how to build prototypes for testing. As far as technical skills were concerned, I was well equipped to turn my ideas into real inventions. Unfortunately, my engineering school, like most others, never went beyond these technical aspects of inventing. For example, we never discussed the business and legal aspects of manufacturing and selling an invention.
The fact is, most first time inventors have little or no understanding of how to go about obtaining a patent to prevent others from copying and profiting from their inventions. They also tend to take a haphazard approach to inventing, neglecting important issues such as whether a market for their invention exists, or whether they will face competition already in place. A lot of time and money can be spent developing an invention, only to discover that it had already been patented by someone else. They do all the up-front work, blissfully unaware of the repercussions of negative possibilities, like getting sued by any existing patent holder, suits which are among the most expensive to defend.
For most individuals the patent process is a hotbed of mysteries and misconceptions. Let’s start unraveling them by first gaining a basic understanding of what a patent is.
In short, a patent grants you a legal right, much like other legal rights you may be more familiar with. For example, if you own property, say a car or piece of real estate, you’re provided with a legal document known as a title. This title defines your legal right to own that property.
Similar to a title, a patent grants you the legal right to own intellectual property, or IP, as its inventor. IP is a term used in the business and legal arenas to refer to creations of the inventor’s mind. Once patented, these creations become the property of the inventor, and they have commercial value. This value is derived from the fact that the patent can be used to exclude others from producing the invention and profiting from it. The IP rights can also be sold or licensed to others for a profit.
IP can encompass subjects as diverse as machinery, articles of manufacture, compositions of matter, and many diverse processes, all of which we’ll look into during the course of this blog series.
___________________________________________

|
Tags: articles of manufacture, compositions of matter, developing an invention, electrical design, engineering expert witness, intellectual property, inventions, inventor, IP, machinery, manufacturing, mechanical design, patent, patent holder, processes, prototypes
Posted in Engineering and Science, Expert Witness, Innovation and Intellectual Property | Comments Off on Patents, Defined
Sunday, September 18th, 2011
| Some people just have a knack in the kitchen, and my wife is among them. She transforms raw ingredients into the most amazing culinary delights, almost like she’s waving a magic wand. The finished products are works of art, hand crafted with tender loving care, and lucky me, I get to feast on them regularly!
During the course of my engineering career I’ve been employed within many industries, and at one point I made the decision to leave the electric utility industry and enter into the world of food manufacturing. I accepted the position of Plant Engineer with a wholesale manufacturer of baking ingredients and frozen pastry products. My main responsibility was the design of food manufacturing equipment and their production lines.
What I had expected to be a relatively straightforward process soon proved to be more challenging. I was no longer working with hard metal as my raw material, that is, gears, nuts, and bolts, but a whole new arena of things described by adjectives such as gooey and pastey. Engineers don’t typically create food products, and let’s face it, you probably wouldn’t want to eat anything that I cooked anyway! But an engineer working within a food manufacturing plant must act as a liaison between the worlds of engineering design and the culinary arts.
Now food manufacturers typically hire professional chefs to develop new products in their research and development (R&D) kitchens. Like my wife, they’re well qualified to produce wonderful hand-made culinary delights. The sticky part comes in when their small batch recipes and preparation techniques don’t translate smoothly to the world of mass production. When it comes to handling food, human fingers are far superior to metal machinery, and raw ingredients behave differently for each.
Herein lies much of the challenge for design engineers within the food industry. How do you design equipment and production lines to make huge quantities of food that look and taste as good as the prototype products made by hand in the R&D kitchen? Next week we’ll find out.
____________________________________________

|
Tags: bolts, electric utility, engineering expert witness, food manufacturing, food manufacturing equipment design, food manufacturing plant, food processing equipment, forensic engineer, gears, machine design, machinery, nuts, plant engineer, production line, research and development
Posted in Engineering and Science, Expert Witness, Forensic Engineering, Innovation and Intellectual Property, Personal Injury, Product Liability | Comments Off on Food Manufacturing Challenges


