| Ever get out of bed on a cold winter morning and feel as stiff as a ladder? Summer’s heat doesn’t have the same effect on aging joints as winter’s chill, and many retirees have been motivated to move into warmer climates because of it.
Heat can change the properties of metals like steel, too. By properties, I mean qualities such as hardness and stiffness–where hardness relates to steel’s ability to resist wear and denting, while stiffness relates to its ability to resist a force that is trying to bend it. Obviously, if things get hot enough, say in the thousands of degrees Fahrenheit, steel will soften and eventually melt into a blob of glowing liquid. At lower temperatures the change will be less dramatic, but its atomic structure will be undergoing change nonetheless. Varying temperatures cause atoms to become energized, causing them to move around within their atomic structure. Depending on how quickly things cool back down, the iron and carbon atoms that make up the steel can end up in different locations, causing a permanent change. The steel could end up softer or harder. For example, slow cooling hot steel in air makes it softer, while rapid cooling, such as when you submerge hot steel quickly into cold oil, makes it harder. How does heat play a part in the ongoing discussion of the centrifugal clutch in a grass trimmer? Well, friction between the shoes and housing generates heat as a result of centrifugal force. Clutch springs are made of steel, which is hard and resistant to bending. But during operation they may heat up to hundreds of degrees, then slowly cool down again when the grass trimmer is shut off. Without getting into a complex explanation of metallurgy, this slow cooling makes the steel in the springs softer, and with time they will lose their stiffness and weaken. Over time the springs become so weak they are unable to overcome the centrifugal force acting on the clutch shoes, causing the clutch to fail at its task of disengaging the cutter head from the engine at idle speed. In other words, as soon as the engine is started, the cutter head will rapidly begin to spin. With these conditions in place, the cutter head poses a threat to anything or anyone making contact with it. Next time we’ll look at another cause of centrifugal clutch failure, that is, component wear due to friction between the clutch shoes and clutch housing. ____________________________________________
|
Posts Tagged ‘safety hazard’

Mechanical Power Transmission – Centrifugal Clutches
Monday, April 2nd, 2012| I remember the days when trimming grass around trees, fences, and flower beds involved the use of hand operated clippers. You know, those scissor-like things that require you to squeeze the handles together to move the blades. Cutting seemed to take forever and there was a lot of bending, stooping, and kneeling which would kill your back and turn your knees green from grass stains. Worst of all, the repetitive motion of squeezing the handles dozens of times would cramp your hands. It was a great day when gasoline powered grass trimmers came along. Just pull the recoil starter cord and you’re ready to go. It’s fast, easy, and the final result looks better too.
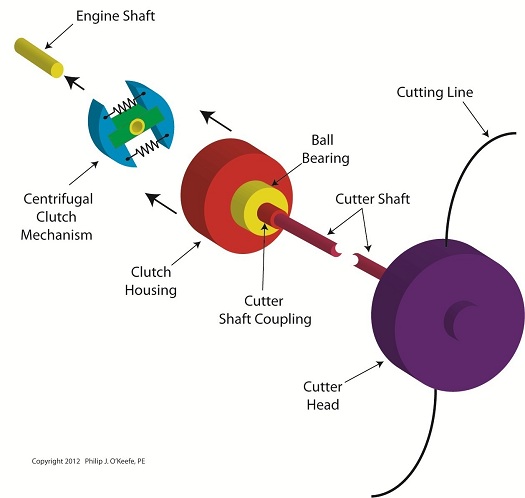
If you’ve ever operated a gasoline powered tool like a grass trimmer, you probably noticed that the cutter action isn’t immediate once the engine is started. Instead, the engine enters into a much slower initial speed mode, the idle speed. The cutter moves only after the throttle trigger is depressed. This introduces more gas to the engine, causing it to speed up, and this action is due to a device called the centrifugal clutch. A centrifugal clutch, or any type of clutch for that matter, serves one basic function, to physically disconnect, then reconnect a gasoline engine from whatever it is powering. For example, if the engine in a weed trimmer stayed permanently connected to the cutter when the engine was started, it would pose a definite safety hazard. Even at idle speed, the cutter would immediately kick into high speed operational mode, and if someone wasn’t prepared for this instant response there would be a good probability of injury. When a centrifugal clutch is placed between the engine and the cutter, it automatically disconnects the engine from the cutter during starting and at idle speed. We’ll see how it does that in a later blog. For now, let’s consider the fact that the idle function serves as a “get ready.” The user is able to both psychologically and physically prepare themselves to use their tool. Pressing the trigger revs the engine up and causes the centrifugal clutch to connect the engine to the cutting action. When the operator takes their finger off the throttle trigger the engine returns to idle speed, and the clutch automatically disconnects the engine from the cutter. The cutter becomes idle. Figure 1
Figure 1 shows a gas trimmer and its centrifugal clutch. The engine is on one end of the trimmer and the cutter at the other. A hollow metal tube runs between them. This tube contains the cutter drive shaft. The centrifugal clutch and its clutch housing are located in a cone shaped compartment between the engine and the metal tube. The clutch is connected to the engine drive shaft and the clutch housing is connected at the other end of the cutter drive shaft. When they’re assembled into the grass trimmer, the clutch fits within the clutch housing. Next time we’ll see how the centrifugal clutch on a grass trimmer uses centrifugal force and friction to automatically transmit mechanical power from the gas engine to the cutter. ____________________________________________
|

Industrial Control Basics – Disconnect Switches
Sunday, March 25th, 2012| Last week our kitchen ceiling fan and light combo decided to stop working. We don’t like eating in the dark, so I was compelled to do some immediate troubleshooting. As an engineer with training in the workings of electricity I have a great respect for it. I’m well aware of potential hazards, and I took a necessary precaution before taking things apart and disconnecting wires. I made the long haul down the stairs to the basement, opened the circuit breaker in the electrical panel, and disabled the flow of electricity to the kitchen. My fears of potential electrocution having been eliminated, my only remaining fear was of tumbling off the ladder while servicing the fan.
Just as I took the precaution to disconnect the power supply before performing electrical maintenance in my home, workers in industrial settings must do the same, and a chief player in those scenarios is the motor overload relay discussed last week. It automatically shuts down electric motors when they become overheated. Let’s revisit that example now.
Figure 1
Our diagram in Figure 1 shows electric current flowing through the circuit by way of the red path. Even if this line were shut down, current would continue to flow along the path, because there is no means to disconnect the entire control system from the hot and neutral lines supplying power to it, that is, it is missing disconnect switches. Electric current will continue to pose a threat to workers were they to attempt a repair to the system. Now let’s see how we can eliminate potential hazards on the line.
Figure 2
In Figure 2 there is an obvious absence of the color red, indicating the lack of current within the system. We accomplished this with the addition of disconnect switches capable of isolating the motor control circuitry, thereby cutting off the hot and neutral lines of the electrical power supply and along with it the unencumbered flow of electricity. These switches are basically the same as those seen in earlier diagrams in our series on industrial controls, the difference here is that the two switches are tied together by an insulated mechanical link. This link causes them to open and close at the same time. The switches are opened and closed manually via a handle. When the disconnect switches are both open electricity can’t flow and nothing can operate. Under these conditions there is no risk of a worker coming along and accidentally starting the conveyor motor. To add yet another level of safety, disconnect switches are often tagged and locked once de-energized. This prevents workers from mistakenly closing them and starting the conveyor while maintenance is being performed. Brightly colored tags alert everyone that maintenance is taking place and the switches must not be closed. The lock that performs this safety function is actually a padlock. It’s inserted through a hole in the switch handle, making it impossible for anyone to flip the switch. Tags and locks are usually placed on switches by maintenance personnel before repairs begin and are removed when work is completed. Now let’s see how our example control system looks in ladder diagram format.
Figure 3
Figure 3 shows a ladder diagram that includes disconnect switches, an emergency stop button, and the motor overload relay contacts. The insulated mechanical link between the two switches is represented by a dashed line. Oddly enough, engineering convention has it that the motor overload relay heater is typically not shown in a ladder diagram, therefore it is not represented here. This wraps up our series on industrial control. Next time we’ll begin a discussion on mechanical clutches and how they’re used to transmit power from gasoline engines to tools like chainsaws and grass trimmers. ____________________________________________
|


Food Manufacturing Challenges – Cleanliness
Monday, October 3rd, 2011| My wife and I have an agreement concerning the kitchen. She cooks, I clean. Plates and utensils are easy enough to deal with, especially when you have a dishwasher. Pots and pans are a little more challenging. But what I hate the most are the food processors, mixers, blenders, slicers and dicers. They’re designed to make food preparation easier and less time consuming, but they sure don’t make the clean up any easier! Quite frankly, I suspect the time involved to clean them exceeds the time saved in food preparation.
Food processors on a larger scale are also used to manufacture many food products in manufacturing facilities, and being larger and more complicated overall, they’re even more difficult to clean. For example, I once designed a production line incorporating a dough mixer for one of the largest wholesale bakery product suppliers in the United States. A small elevator was required to lift vast amounts of ingredients into a mixing bowl the size of a compact car. Its mixing arms were so heavy, two people were required to lift them into position. It was also my task to ensure that the equipment as designed was capable of being thoroughly cleaned in a timely and cost effective manner. Food processing machinery must be designed so that all areas coming into contact with ingredients can be readily accessed for cleaning. And since most of the equipment you are dealing with in this setting is far too cumbersome to be portable, the majority of the cleaning must be cleaned in place, known in the industry as CIP. To facilitate CIP, commercial machinery is designed with hatches and special covers that allow workers to get inside with their cleaning equipment. Small, portable parts of the machine, such as pipes, cutting blades, forming mechanisms, and extrusion dies, are often made to be removable so that they can be carried over to an industrial sized sink for cleaning out of place, or COP. These potable machine components are typically removable for COP without the use of any tools and are fitted with flip latches, spring clips, and thumb screws to facilitate the process. Everything in a food manufacturing facility, from production machinery to conveyor belts, is typically cleaned with hot, pressurized water. The water is ejected from the nozzle end of a hose hooked up to a specially designed valve that mixes steam and cold water. The result is scalding hot pressurized water that easily dislodges food residues. Bacteria doesn’t stand a chance against this barrage. The water, which is maintained at about 180°F, quickly sterilizes everything it makes contact with. It also provides a chemical-free clean that won’t leave behind residues. Once dislodged, debris is flushed out through strategically placed openings in the machine which then empty into nearby floor drains. As a consequence of the frequent cleanings commercial food preparation machinery requires, their parts must be able to withstand frequent exposure to high pressure water streams. Parts are typically constructed of ultra high molecular weight (UHMW) food-grade plastics and metal alloys such as stainless steels, capable of withstanding the corrosive effects of water. And since water and electricity make a dangerous combination, gaskets and seals on the equipment must be tight enough to protect against water making its way into motors and other electrical parts. Next time we’ll look at how design engineers of food manufacturing equipment use a systematic approach to minimize the possibility of food safety hazards, such as product contamination. ____________________________________________
|


