| The Olympic Torch relay, soon to culminate in London, is the grand daddy of all relays, starting in one country, traversing many others, then ending its journey at the site of the Olympic Games. It passes through many athletes’ hands while on its journey, its final purpose being to light the Olympic Flame. Less glamorous, though still useful, is the relay race that often takes place within digital controls.
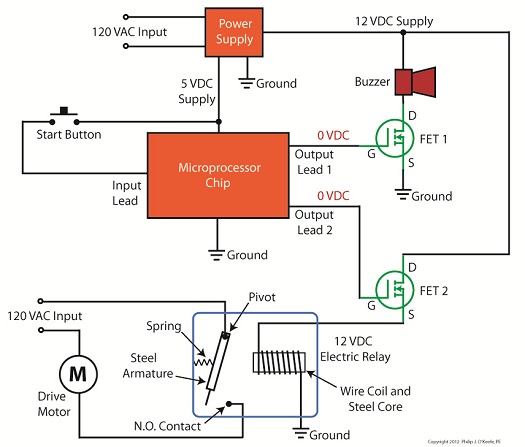
Last time we looked at my design solution for the control of a microprocessor controlled medical x-ray film developing machine, where a field effect transistor (FET) acted as a digital control interface between a 5 volt direct current (VDC) microprocessor and a 12 VDC buzzer. Well, controlling the buzzer wasn’t the only function of the microprocessor. It also had to control a 120 volt alternating current (VAC) drive motor, the purpose of which was to move x-ray film through a series of processes within the machine. Yet another requirement was that the machine’s drive motor run 40 minutes upon activation by a start button, then shut off. One of the challenges presented by this specification was that an FET standing alone is only suited to control direct current devices like the buzzer, but not alternating current devices like electric motors. Direct current flows in one direction only when traveling through wire, and since an FET can only pass current in one direction it is the perfect match for those applications. Now, as the name would imply, alternating current flow alternates, that is, it reverses direction and varies in intensity many times each second. This is a scenario that FETs are not equipped to handle because they can’t deal with reverse flow. This meant that, for the purpose of my developing machine, I could not use an FET to directly control the 120 VAC motor. Now let’s take a look at Figure 1 to get a basic look at how I solved the problem. |
Posts Tagged ‘relay coil’
Transistors – Digital Control Interface, Part IV
Monday, July 9th, 2012Tags: 12 VDC, 120 VAC, alternating current, digital control, digital control interface, digital input, digital output, direct current, drain, drive motor, electric current, electric motor control, electric motors, electric relay, electrical ground, electronic device, engineering expert witness, FET, field effect transistor, forensic engineer, gate, machine control, microprocessor, microprocessor chip, output lead, pushbutton, relay coil, source, start button, transistor, x-ray film machine
Posted in Engineering and Science, Expert Witness, Forensic Engineering, Innovation and Intellectual Property, Personal Injury, Product Liability | 1 Comment »
Industrial Control Basics – Emergency Stops
Sunday, February 26th, 2012| Ever been in the basement when you heard a loud thud followed by a scream by a family member upstairs? You run up the stairs to see what manner of calamity has happened, the climb seeming to take an eternity. Imagine a similar scenario taking place in an industrial setting, where distances to be covered are potentially far greater and the dangerous scenarios numerous.
Suppose an employee working near a conveyor system notices that a coworker’s gotten caught in the mechanism. The conveyor has to be shut down fast, but the button to stop the line is located far away in the central control room. This is when emergency stop buttons come to the rescue, like the colorful example shown in Figure 1. Figure 1
Emergency stop buttons are mounted near potentially dangerous equipment in industrial settings, allowing workers in the area to quickly de-energize equipment should a dangerous situation arise. These buttons are typically much larger than your standard operational button, and they tend to be very brightly colored, making them stick out like a sore thumb. This type of notoriety is desirable when a high stress situation requiring immediate attention takes place. They’re easy to spot, and their shape makes them easy to activate with the smack of a nearby hand, broom, or whatever else is convenient. Figure 2 shows how an emergency stop button can be incorporated into a typical motor control circuit such as the one we’ve been working with in previous articles. Figure 2
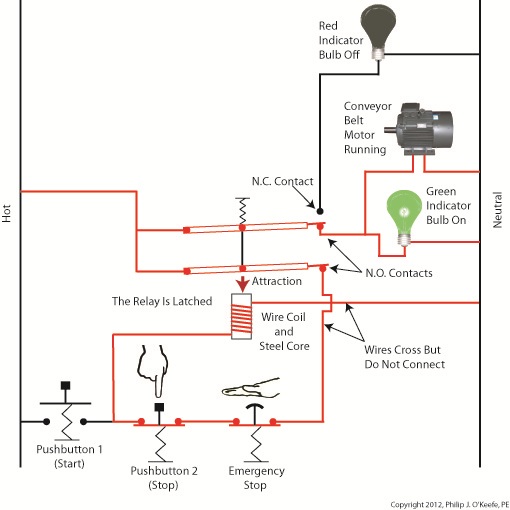
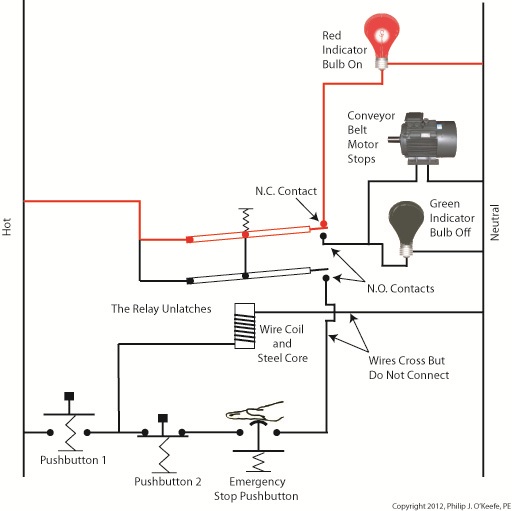
An emergency stop button has been incorporated into the circuit in Figure 2. It depicts what happens when someone depresses Button 1 on the conveyor control panel. The N.C. contact opens, and the two N.O. contacts close. The motor starts, and the lit green bulb indicates it is running. The electric relay is latched because its wire coil remains energized through one N.O. contact. It will only become unlatched when the flow of current is interrupted to the wire coil, as is outlined in the following paragraph. The red lines denote areas with current flowing through them. Both Button 2 and the emergency stop button typically reside in normally closed positions. As such electricity will flow through them on a continuous basis, so long as neither one of them is re-engaged. If either of them becomes engaged, the same outcome will result, an interruption in current on the line. The relay wire coil will then become de-energized and the N.O. contacts will stay open, preventing the wire coil from becoming energized again after Button 2 or the emergency stop are disengaged. Under these conditions the conveyor motor stops, the green indicator bulb goes dark, the N.C. contact closes, and the red light comes on, indicating that the motor is not running. This sequence, as it results from hitting the emergency stop button, is illustrated in Figure 3. Figure 3
We now have the means to manually control the conveyor from a convenient, at-the-site-of-occurrence location, which allows for a quick shut down of operations should the need arise. So what if something else happens, like the conveyor motor overheats and catches on fire and no one is around to notice and hit the emergency stop? Unfortunately, in our circuit as illustrated thus far the line will continue to operate and the motor will continue to run unless we incorporate an additional safeguard, the motor overload relay. We’ll see how that’s done next time. ____________________________________________ |
Tags: control panel, control room, conveyor, de-energize equipment, electric relay, emergency pushbutton, emergency stop button, engineering expert witness, equipment shut down, fire, forensic engineer, hot, indicator bulb, industrial control, ladder diagram, latched relay, motor control, motor control circuit, motor overheat, N.C. contact, N.O. contact, NC contact, neutral, NO contact, overload relay, push button, pushbutton, relay armature, relay coil, relay ladder logic, safeguard, unlatched relay
Posted in Engineering and Science, Expert Witness, Forensic Engineering, Innovation and Intellectual Property, Personal Injury, Product Liability, Professional Malpractice | 2 Comments »


