|
Did you know that from the early days of the Industrial Revolution until well into the 20th Century it was common practice for all aspects of a product to be built entirely under one roof? For example, a wheelchair manufacturer in the 1890s would buy the various raw materials needed to construct component parts, everything from bars of steel and wooden boards to rattan stalks and gum rubber, then produce every part of the wheelchair in one facility. Items as diverse as chair frames, footrests, wicker seat cushions, springs, wheel rims and spokes, and tires would all be constructed from the raw materials purchased, then assembled into the finished product. Doesn’t sound like an efficient process to you? Henry Ford didn’t think so either. In fact, he is credited with pioneering mass production in manufacturing when he observed during the production process of his line of automobiles that inefficiencies abounded. Inefficiencies in manufacturing are common, as they are in everyday life. Last time we saw how robots, i.e., the introduction of industrial automation, can be used during the Production stage of our systems engineering approach to medical device design to increase efficiency and reduce manufacturing costs. Today we’ll take a look at another inefficient practice, along with its solution. Returning to our wheelchair manufacturer, the problems associated with manufacturing and assembling all aspects of a product are many. At the top of the list is the substantial cash outlay that’s required to buy and maintain a huge factory complex and all the specialized equipment required to make each and every part. In addition, there’s the ongoing expense of employing and training employees needed to fabricate each component. In other words, the wheelchair factory has a lot of fixed overhead expense to carry, and the more overhead there is, the more expensive the end product. Expenses such as these are almost always passed on to the buyer. The solution? Outsourcing. That is, using outside manufacturers to produce many, perhaps even all, of the component parts. Then our wheelchair manufacturer would simply assemble the purchased parts into the finished product, resulting in lower manufacturing costs and higher profits. The benefits of outsourcing were widely recognized in the decades following World War II, when the post-war economy was booming and demand for consumer goods increased dramatically. That ends our look at the Production stage. Next time we’ll move on to the Utilization stage to see how the systems engineering approach is put into play once the medical device has been introduced into the marketplace. ___________________________________________
|
Posts Tagged ‘appliance’
Systems Engineering In Medical Device Design – Production, Part 4
Sunday, March 17th, 2013
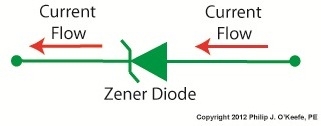
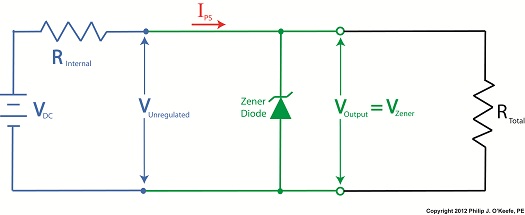
Transistors – Voltage Regulation Part XV
Sunday, October 28th, 2012

The Microwave Oven — More on How AC Becomes DC
Monday, August 15th, 2011| The world of electricity is full of mysteries and often unanticipated outcomes, and if you’ve been reading along with my blog series you have been able to appreciate and come to some understanding of a fair number of them. This week’s installment will be no exception.
Last week we looked briefly at the high voltage circuit within a microwave oven. We discovered that the circuit contains a transformer that raises 120 volts alternating current (AC) to a much higher voltage, around 4000 volts AC. The circuit then transforms the AC into direct current (DC) with the help of electronic components known as a diode and capacitor. Let’s take a closer look at how the diode and capacitor work together to make AC into DC. Let’s follow an AC wave with the aid of a device called an oscilloscope. An oscilloscope takes in an electronic signal, measures it, graphs it, and shows it on a display screen so you can see how the signal changes over time. An AC wave is shown in Figure 1 as it would appear on an oscilloscope. Figure 1 – Alternating Current Wave You can see that each wave cycle starts with a zero value, climbs to a positive maximum value, then back to zero, and finally back down to a maximum negative value. The current keeps alternating between positive and negative polarity, hence the name “alternating current.” Within the microwave oven’s high voltage circuitry the transformer does the job of changing, or transforming if you will, 120 volts AC into 4000 volts AC. This high voltage is needed to make electrons leave the cathode in the magnetron and move them towards the anode to generate microwaves. But we’re not done with the transformation process yet. The magnetron requires DC to operate, not AC. DC current remains constant over time, maintaining a consistent positive value as shown in Figure 2. It is this type of consistency that the magnetron needs to operate.
Figure 2 – Direct Current The microwave’s diode and capacitor work together to convert the 4000 volts AC into something which resembles 4000 volts DC. First the diode acts like a one-way valve, passing the flow of positive electric current and blocking the flow of negative current. It effectively chops off the negative part of the AC wave, leaving only positive peaks, as shown in Figure 3.
Figure 3 – The Diode Chops Off The Negative Part of the AC Wave Between the peaks are gaps where there is zero current, and this is when the capacitor comes into play. Capacitors are similar to batteries because they can be charged with electrical energy and then discharge that energy when needed. Unlike a battery, the capacitor charges and discharges very quickly, within a fraction of a second. Within the circuitry of a microwave oven the capacitor charges up at the top of each peak in Figure 3, then, when the current drops to zero inside the gaps the capacitor comes into play, discharging its electrical energy into the high voltage circuit. The result is an elimination of the zero current gaps. The capacitor acts as a reserve energy supply to fill in the gaps between the peaks and keep current continually flowing to the magnetron. We have now witnessed a mock DC current situation being created, and the result is shown in Figure 4.
Figure 4 – The Capacitor Discharges to Fill In The Gaps Between Peaks The output of this approximated DC current looks like a sawtooth pattern instead of the straight line of a true DC current shown in Figure 2. This ripple pattern is evidence of the “hoax” that has been played with the AC current. The net result is that the modified AC current, thanks to the introduction of the diode and energy storing capacitor, has made an effective enough approximation of DC current to allow our magnetron to get to work jostling electrons loose from the cathode and putting our microwave oven into action. You now have a basic understanding of how to turn AC into an effective approximation of DC current. Next week we’ll find out how this high voltage circuit can prove to be lethal, even when the microwave oven is unplugged. ____________________________________________ |


The Microwave Oven High Voltage Circuit—How AC Becomes DC
Sunday, August 7th, 2011| My mom was a female do-it-yourselfer. Toaster on the blink? Garbage disposal grind to a halt? She’d take them apart and start investigating why. Putting safety first, she always pulled the plug on electrical appliances before working on them. Little did she know that this safety precaution would not be enough in the case of a microwave oven. Let’s see how even an unplugged microwave can prove to be a lethal weapon and, yes, we’re going to have to get technical.
Last week we talked about the magnetron and how it needs thousands of volts to operate. To get this high of a voltage out of a 120 volt wall outlet–the voltage that most kitchen outlets provide–the microwave oven is equipped with electrical circuitry containing three important components: a transformer, a diode, and a capacitor, and just like the third rail of an electric railway system these items are to be avoided. If you decide to take your microwave oven apart and you come into contact with high voltage that is still present, you run the risk of injury or even death. But how can high voltage be present when it’s unplugged? Read on. First we need to understand how the 120 volts emitting from your wall outlet becomes the 4000 volts required to power a microwave’s magnetron. This change takes place thanks to a near magical act performed by AC, or alternating current. In the case of our microwave components, specifically its diode and capacitor, AC is made to effectively mimic the power of DC, or direct current, the type of current a magnetron needs. This transformation is made possible through the storage of electrical energy within the microwave’s capacitor. Next week we’ll examine in detail how this transformation from AC to DC current takes place, as seen through a device called an oscilloscope. ____________________________________________
|

GFCI Outlets and The Mighty Robot
Sunday, July 3rd, 2011| Most people aren’t aware of just how important those strange looking wall outlets in our kitchens and bathrooms are, you know, the ones with the little buttons that say Test and Reset. They’re known as GFCI outlets, that is Ground Fault Circuit Interrupters, and given the right set of circumstances they could save your life.
The GFCI equipped wall outlet, like a mighty robot, continuously watches the flow of electrons (electrical current) passing through, always on the lookout for incongruities between the hot and neutral wires, and ready to jump into action when necessary. Say, for example, that one of these GFCI equipped outlets has an appliance plugged into it. While the appliance is in safe use there is nothing for the GFCI robot to do. It simply takes note of the balance of electrons flowing between the hot and neutral conductors, notes that they are equal, and continues to watch for inequalities.
But suppose that there is a problem with the appliance, something that causes a ground fault where the user’s body provides an unintended path to errant electrons flowing from the hot side of the wall outlet. Those errant electrons are supposed to traverse the neutral wire back through the wall outlet from whence they came, but they have become unruly. Not to worry, if you are up to code and have an ever vigilant GFCI on that outlet, the robot will immediately notice the anomaly.
Figure 2 – If a Ground Fault Develops in the Hand Mixer and Some Electric Current Flows Through the User’s Body, Then the Robot Notices a Difference In Current Flowing Through the Hot and Neutral Wires in the GFCI Outlet. The Mighty Robot of the GFCI doesn’t like the fact that the electrons are out of balance, that there are more of them flowing through the hot wire than returning through the outlet via the neutral wire, so within a fraction of a second it will jump into action to correct things. It hits a lever on a spring loaded mechanism that snaps open an electrical switch connecting the appliance to the hot and neutral sides of the outlet, effectively cutting off the flow of electrons to the appliance. Cut off from power, the appliance ceases to function, but more importantly, the flow of electrons through the user’s body has been stopped before their body incurs injury, or death.
Figure 3- In Response to the Ground Fault, the Robot Opens a Switch in the GFCI Outlet to Cut Off The Flow of Electricity to the Hand Mixer. The Person Operating the Hand Mixer is Saved. The GFCI robot, having done its job, now goes into a sleep mode. It will be reactivated, ready again for its vigilant watch of errant electrons, when the faulty appliance is unplugged and the Reset button is pressed. This button does what it says, it resets the spring loaded mechanism in the wall outlet, closing the electrical switch, and making the outlet functional again. The GFCI robot immediately goes back into active monitoring mode. Now it should be noted that as dependable as GFCI outlets are, they can become defective. That’s why they have a Test button. This button should be pressed periodically to see if the robot is still on the job. If all is in order, the Reset button pops out of the outlet, and anything plugged into that outlet will not operate. When you press the Reset button back in, everything should operate again if there are no fault conditions. Could the GFCI’s Mighty Robot have prevented the unfortunate incidents discussed during my tenure on The Discovery Channel? Stay tuned to find out… That’s it for GFCI outlets. Next time we’ll take a look at how an invention developed to defend the allies during World War II later morphed into a space age device that cooks our food. _____________________________________________ |


Wire Size and Electric Current
Sunday, March 13th, 2011| Whether or not you live or work in a city, you are probably aware of rush hour traffic and how frustrating it can be. As a matter of fact, this traffic is the number one reason many choose to live within cities providing public transportation. Instead of watching the cars pile up in front of you, you can be checking your email or reading the paper. And no matter where you live, you’ve probably encountered a narrow one-lane road at some time. If this road were to be spotted with traffic lights and double parked cars, the resulting frustration would reach a new high, one which has you craving the freedom of a crowded three-lane expressway. At least there’s the possibility of movement there.
Generally, the wider the road and the fewer the impediments, the better traffic will flow. The problems presented by vehicular traffic are analogous to those present in electrical wires. For both, obstructions are impediments to flow. You see, the thicker the metal is in a wire, the more electrical current it can carry. But before we explore why, let’s see how electric wires are classified. If you’ve ever spent any time hanging around a hardware store looking at the goodies, you’ve probably come across wire gauge numbers, used to categorize wire diameter. American Wire Gauge (AWG) is a standardized wire gauge system, used in North American industry since the latter half of the 19th Century. Handy as it is, the AWG gauge numbering system seems to go against logic, because as a wire’s diameter increases, its gauge number decreases. For example, a wire gauge number of 8 AWG has a diameter of 0.125 inches, while a gauge number of 12 AWG has a diameter of 0.081 inches. To make things easier on those who need to know this type of information, wire diameter is tabulated for each AWG gauge number and readily available in engineering reference books. So what does this have to do with electric current? To begin with, the larger the AWG number, the less current it can safely carry. If we turn to an engineering reference book, and look up information relating to an 8 AWG insulated copper wire, we find that it can safely carry an electrical current of 50 amperes, while a 12 AWG insulated copper wire can safely carry only 25 amperes. This information allows us to make important and relevant design decisions regarding a myriad of things, from electrical wiring in electronic devices, to appliances, automobiles, and buildings. So, why are bigger wires able to carry more current? Well, as you’ve heard me say before, no wire is a perfect conductor of electricity, but some metals, take copper for instance, are better conductors than others, say steel. But even the best conductors are inherently full of impurities and imperfections that resist the flow of electricity. This electrical resistance acts much like traffic lights and double parked cars that impede the flow of traffic. The larger the diameter of the wire, the less electrical resistance is present. The logic here is simple. Wire that is larger allows more paths for electrical current to flow around impurities and imperfections. The congestion present in rush hour traffic results in travel delays and hot tempers, and heat is also present in electric wires that face resistance to electricity flow. If the resistance to electric current flow is high enough, it can cause overheating. Road rage within the wires is a possibility, and if the wires get hot enough, electrical insulation can melt and burn, creating a fire. Known as the “Joule heating” effect, this phenomenon is responsible for its share of building fires. We’ll learn more about Joule heating and how wires are sized to keep electrical current flow within safe limits next week. Until then, try to keep out of traffic. _____________________________________________
|


