| I’m sure you’ve seen the television commercials warning about harmful interactions between prescription medications. By the same token electronic circuitry can also be adversely affected by certain combinations of electrical components, as we’ll discuss in today’s blog.
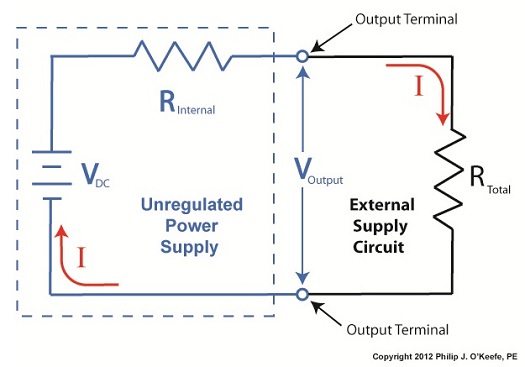
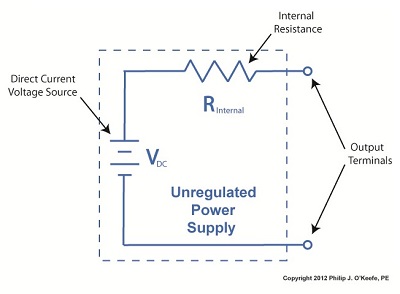
Last time we looked at a circuit schematic containing an unregulated power supply. This power supply was connected to an external supply circuit containing a number of components such as electric relays, buzzers, and lights. Each of these components has a resistance factor, and combined they have a total resistance of RTotal. We saw that when RTotal increases, the electrical current, I, decreases, and when RTotal decreases, I increases. In contrast to this increasing/decreasing activity of the total resistance RTotal, the fixed internal resistance of the unregulated power supply, RInternal, doesn’t fluctuate. Let’s explore Ohm’s Law further to see how the static effect of RInternal combines with the changing resistance present in RTotal to adversely affect the unregulated power supply output voltage, VOutput, causing it to fluctuate. Figure 1
In Figure 1 RTotal and RInternal are operating in series, meaning they are connected together like sausage links. In this configuration their two resistances add together as if they were one larger resistor. Generally speaking, Ohm’s Law sets out that the current, I, flowing through a resistor in an electrical circuit equals the voltage, V, applied to the resistor divided by the resistance R, or: I = V ÷ R In the case of the circuit represented in Figure 1, the resistors RInternal and RTotal are connected in series within the circuit, so their resistances must be added together to arrive at a total power demand. Voltage is applied to these two resistors by the same voltage source, VDC. So, for the circuit as a whole Ohm’s Law would be written as: I = VDC ÷ (RInternal + RTotal) But, Ohm’s Law can also be applied to individual parts within the circuit, just as it can be applied to a single kitchen appliance being operated on a circuit shared with other appliances. Let’s see how this applies to our example circuit’s RTotal next week. ____________________________________________ |
Posts Tagged ‘resistance’
Transistors – Voltage Regulation Part V
Sunday, August 19th, 2012Transistors – Voltage Regulation Part II
Sunday, July 29th, 2012| I joined the Boy Scouts of America as a high schooler, mainly so I could participate in their Explorer Scout program and learn about electronics. I will forever be grateful to the Western Electric engineers who volunteered their personal time to stay after work and help me and my fellow Scouts build electronic projects. The neatest part of the whole experience was when I built my first regulated power supply with their assistance inside their lab. But in order to appreciate the beauty of a regulated power supply we must first understand the shortcomings of an unregulated one, which we’ll begin to do here.
Last time we began to discuss how the output voltage of an unregulated power supply can vary in response to power demand, just as when sprinklers don’t have sufficient water flow to cover a section of lawn. Let’s explore this concept further. Figure 1
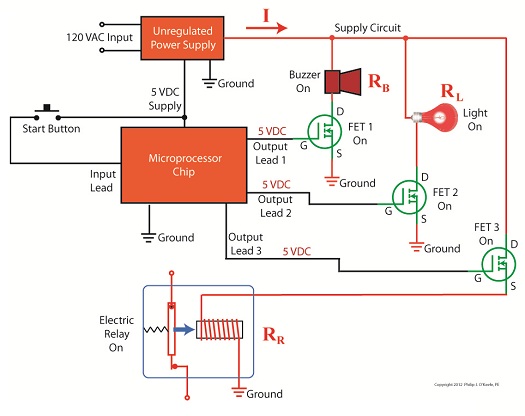
Figure 1 shows a very basic representation of a microprocessor control system that operates three components, an electric relay (shown in the blue box), buzzer, and light. These three components have a certain degree of internal electrical resistance, annotated as RR, RB, and RL respectively. This is because they are made of materials with inherent imperfections which tend to resist the flow of electric current. Imperfections such as these are unavoidable in any electronic device made by humans, due to impurities within metals and irregularities in molecular structure. When the three components are activated by the microprocessor chip via field effect transistors, denoted as FET 1, 2 and 3 in the diagram, their resistances are connected to the supply circuit. In other words, RR, RB, and RL create a combined level of resistance in the supply circuit by their connectivity to it. If a single component were to be removed from the circuit, its internal resistance would also be removed, resulting in a commensurate decrease in total resistance. The greater the total resistance, the more restriction there is to current flow, denoted as I. The greater the resistance, the more I is caused to decrease. In contrast, if there is less total resistance, I increases. The result of changing current flow resistance is that it causes the unregulated power supply output voltage to change. This is all due to an interesting phenomenon known as Ohm’s Law, represented as this within engineering circles: V = I × R where, V is the voltage supplied to a circuit, I is the electrical current flowing through the circuit, and R is the total electrical resistance of the circuit. So, according to Ohm’s Law, when I and R change, then V changes. Next time we’ll apply Ohm’s Law to a simplified unregulated power supply circuit schematic. In so doing we’ll discover the mathematical explanation to the change in current flow and accompanying change in power supply output voltage we’ve been discussing. ____________________________________________ |
Wire Size and Electric Current – Joule Heating
Sunday, March 20th, 2011| Ever take a peek inside the toaster while you’re waiting for the toast to pop up? If so, you would have noticed a bright orange glow. That glow is produced when the toasting wires heat up, which in turn creates a nice crusty surface on your bread or waffle. It’s the same phenomenon as when the filament inside an incandescent bulb glows. The light and heat produced in both these cases are the result of the Joule, pronounced “jewel,” effect at work.
To understand Joule heating, let’s first refresh our memories as to electrical current resistance. We learned previously that wire is not a perfect conductor, and as such resistance to flow is encountered. This resistance causes power to be lost along the length of wire, in accordance with this equation: Power Loss = I2 × R Where I is the electric current flowing through a wire, and R is the total electrical resistance of the wire. The power loss is measured in units of Joules per second, otherwise known as watts, “watt” denoting a metric unit of power. It is named after the famed Scottish mechanical engineer, James Watt, who is responsible for inventing the modern steam engine. A Joule is a metric unit of heat energy, named after the English scientist James Prescott Joule. He was a pioneer in the field of thermodynamics, a branch of physics concerned with the relationships between different forms of energy. Anyway, to see how the equation works, let’s look at an example. Suppose we have 12 feet of 12 AWG copper wire. We are using it to feed power to an appliance that draws 10 amperes of electric current. Going to our handy engineering reference book, we find that the 12 AWG wire has an electrical resistance of 0.001588 ohms per foot, “ohm” being a unit of electrical resistance. Plugging in the numbers, our equation for total electrical resistance becomes: R = (0.001588 ohms per foot) × 12 feet = 0.01905 ohms And we can now calculate power loss as follows: Power = I2 × R = (10 amperes)2 × (0.01905 ohms) = 1.905 watts Instead of using a 12 AWG wire, let’s use a smaller diameter wire, say, 26 AWG. Our engineering reference book says that 26 AWG wire has an electrical resistance of 0.0418 ohms per foot. So let’s see how this changes the power loss: R = (0.0418 ohms per foot) × 12 feet = 0.5016 ohms Power = I2 × R = (10 amperes)2 × (0.5016 ohms) = 50.16 watts This explains why appliances like space heaters and window unit air conditioners have short, thick power cords. They draw a lot of current when they operate, and a short power cord, precisely because it is short, poses less electrical resistance than a long cord. A thicker cord also helps reduce resistance to power flow. The result is a large amount of current flowing through a superhighway of wire, the wide berth reducing both the amount of power loss and the probability of dangerous Joule heating effect from taking place. Our example shows that the electric current flowing through the 12 AWG wire loses 1.905 watts of power due to the inconsistencies within the wire, and this in turn causes the wire to heat up. This is Joule heating at work. Joule heating of 50.16 watts in the thinner 26 AWG wire can lead to serious trouble. When using a power cord, heat moves from the copper wire within it, whose job it is to conduct electricity, and beyond, on to the electrical insulation that surrounds it. There the heat is not trapped, but escapes into the environment surrounding the cord. If the wire has low internal resistance and the amount of current flowing through it is within limits which are deemed to be acceptable, then Joule heating can be safely dissipated and the wire remains cool. But if the current goes beyond the safe limit, as specified in the American Wire Gauge (AWG) table for that type of wire, then overheating can be the result. The electrical insulation may start to melt and burn, and the local fire department may then become involved. That’s it for wire sizing and electric current. Next time we’ll slip back into the mechanical world and explore a new topic: the principles of ventilation. _____________________________________________ |
Transformers – Electric Utility Power Savers
Sunday, January 2nd, 2011| Each day millions of Americans start their mornings with coffee, brewed in a coffee maker, and a microwaved breakfast. They flick on the light and exhaust fan before starting their showers and blow dry their hair afterwards. Each of these acts of modern living is a small miracle. And if you’re like most people you can’t see the power plant supplying the power to your modern conveniences from your home, and how the electricity travels from the plant to you isn’t too clear.
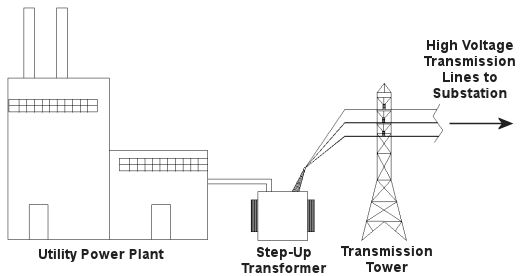
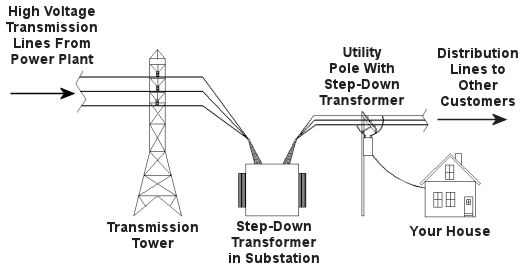
Truth is the process of supplying our homes with power isn’t as straightforward as you might think, and the actual transmission of that power isn’t straightforward at all. To begin with, the wires used in power lines are less than perfect conductors of electricity. Along any given length of wire there are all sorts of imperfections in the metal, and these tend to resist the flow of electrical current. These imperfections will always exist to some extent, even with the best manufacturing techniques and quality control, and the longer the power line, the more resistance the power flow will meet. The result is loss of electrical power. If there weren’t some kind of compensatory action at work to rectify this, your morning routine wouldn’t be nearly so smooth. To address the problem of power loss electric utilities use step-up transformers, similar to the one in Figure 1. This enables voltage produced by the generator at the plant to be raised to a higher voltage, in turn enabling it to travel longer distances and remain effective. Figure 1 – Electricity Leaving the Power Plant Goes Through a Step-Up Transformer For example, let’s say that an electric generator puts out 12,000 volts, and a step-up transformer raises that to 765,000 volts, enabling transmission to customers far away. If you will recall from last week’s blog, with electrical transformers, there is an inverse relationship between voltage and current. So, when a step-up transformer increases input voltage, it actually results in a lowering of electrical current. So how does this phenomenon aid in power transmission? Simply put, when there is less current flowing through the wires, there is an accompanying reduction in power loss over the long length of the transmission line. Let’s take a look at what happens when the power reaches our homes. Figure 2 shows a simplified distribution route from the power plant. Figure 2 – A Step-Down Transformer is Used to Supply Electric Utility Customers First, the higher voltage originating from the step-up transformer at the power plant is decreased by the use of a step-down transformer located in a substation many miles away at the other end of the transmission line. The use of this intermediary step-down transformer effectively lowers the voltage and at the same time raises the current at the other end of the line, the end where customers like you and I are waiting to use our hair dryers unimpeded. The path that the power follows is somewhat circuitous, but well planned out, with numerous strategically positioned distribution lines acting as the final leg of delivery. These distribution lines do what their name implies, they weave their way along streets and alleys, finally distributing electricity to customers. A step-down transformer located in a substation along the power transmission route allows this all to happen. It can readily convert the 765,000 volts being sent by the power plant to the 25,000 volts needed to feed distribution power lines. These, in turn, power individual homes, hospitals, etc. Now you obviously can’t plug a television into a 25,000 volt wall outlet located in your house, so another step-down transformer is required to temper it into power that’s both usable and safe. The one in our diagram is mounted on a nearby utility pole, and its job is to lower the 25,000 volts which it receives into a more manageable 240 and 120 volts, which is then fed into your home. That wraps up our series on electrical transformers. Perhaps the next time you flip that switch in your home, whether it be on your hair dryer, TV, or what have you, you’ll pause for a moment to reflect on the long path it has followed to make your life just a little bit easier. _____________________________________________
|
