Last time we opened our discussion on the Development stage of the systems engineering approach to medical device design and discovered that the best design concept is the one that meets all stakeholder requirements. Let’s use the flow chart shown in Figure 1 to illustrate what comes next in this stage.
Figure 1To begin the transformation from concept to completed design, engineers review documentation created during the Concept stage, including design notes, concept sketches, and of course the final requirements specification which has been approved by all stakeholders. Once the review is completed, it serves as a guide to the creation of detailed design documentation, including mechanical drawings, electrical schematics, and wiring diagrams. A bill of materials, or BOM, is also created, listing all parts needed to produce the final product. Each part designated within the BOM is associated with a specific manufacturer or supplying vendor, and each has been qualified with regard to price, availability, functionality, and quality. The design documentation and BOM are also subject to a review by a fresh set of eyes, engineers who have no involvement in the project. If they should discover a problem, the design is rejected and sent back to the design engineers for revision. This process of evaluation and correction are repeated until the design successfully passes a final review. Only then can the fully approved finished design move on to the production stage. Next time we’ll continue our discussion of the Development stage, moving our concept medical device further along its journey to the Production stage. ___________________________________________ |
Archive for the ‘Professional Malpractice’ Category

Transistors – Digital Control Interface, Part II
Sunday, June 24th, 2012| Not too long ago I was retained as an engineering expert to testify on behalf of a plaintiff who owned a sports bar. The place was filled with flat screen televisions that were plugged into 120 volt alternating current (VAC) wall outlets. To make a long story short, the electric utility wires that fed power to the bar were hit by a passing vehicle, causing the voltage in the outlets to increase well beyond what the electronics in the televisions could handle. The delicate electronics were not suited to be connected with the high voltage that suddenly surged through them as a result of the hit, and they overloaded and failed.
Similarly, lower voltage microprocessor and digital logic chips are also not suited to directly connect with higher voltage devices like motors, electrical relays, and light bulbs. An interface between the two is needed to keep the delicate electronic circuits in the chips from overloading and failing like the ill fated televisions in my client’s sports bar. Let’s look now at how a field effect transistor (FET) acts as the interface between low and high voltages when put into operation within an industrial product. I was once asked to design an industrial product, a machine which developed medical x-ray films, utilizing a microprocessor chip to automate its operation. The design requirements stated that the product be powered by a 120 VAC, such as that available through the nearest wall outlet. In terms of functionality, upon startup the microprocessor chip was to be programmed to first perform a 40-minute warmup of the machine, then activate a 12 volt direct current (VDC) buzzer for two seconds, signaling that it was ready for use. This sequence was to be initiated by a human operator depressing an activation button. The problem presented by this scenario was that the microprocessor chip manufacturer designed it to operate on a mere 5 VDC. In additional, it was equipped with a digital output lead that was limited in functionality to either “on” or “off” and capable of only supplying either extreme of 0 VDC or 5 VDC, not the 12 VDC required by the buzzer. Figure 1 illustrates my solution to this voltage problem, although the diagram shown presents a highly simplified version of the end solution.
Figure 1The illustration shows the initial power supplied at the upper left to be 120 VAC. This then is converted down to 5 VDC and 12 VDC respectively by a power supply circuit. The 5 VDC powers the microprocessor chip and the 12 VDC powers the buzzer. The conversion from high 120 VAC voltage to low 5 and 12 VDC voltage is accomplished through the use of a transformer, a diode bridge, and special transistors that regulate voltage. Since this article is about FETs, we’ll discuss transistor power supplies in more depth in a future article. To make things a little easier to follow, the diagram in Figure 1 shows the microprocessor chip with only one input lead and one output lead. In actuality a microprocessor chip can have dozens of input and output leads, as was the case in my solution. The input leads collect information from sensors, switches, and other electrical components for processing and decision making by the computer program contained within the chip. Output leads then send out commands in the form of digital signals that are either 0 VDC or 5 VDC. In other words, off or on. The net result is that these signals are turned off or on by the program’s decision making process. Figure 1 shows the input lead is connected to a pushbutton activated by a human. The output lead is connected to the gate (G) of the FET. The FET is shown in symbolic form in green. The FET drain (D) lead is connected to the buzzer and its source (S) lead terminates in connection to electrical ground to complete the electrical circuit. Remember, electric current naturally likes to flow from the supply source to electrical ground within circuits, and our scenario is no exception. Next time we’ll see what happens when someone presses the button to put everything into action.
____________________________________________ |

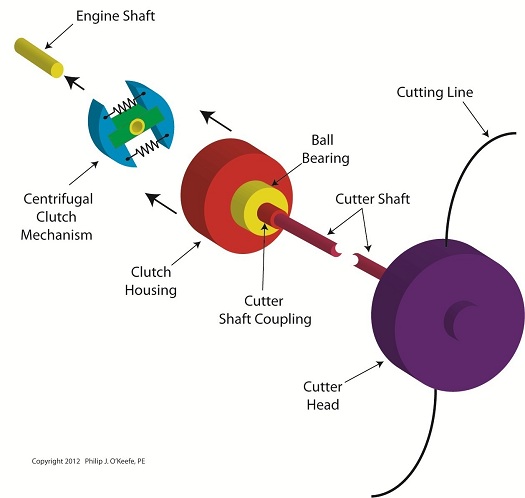
Mechanical Power Transmission – The Centrifugal Clutch Feels The Heat
Sunday, May 27th, 2012| Ever get out of bed on a cold winter morning and feel as stiff as a ladder? Summer’s heat doesn’t have the same effect on aging joints as winter’s chill, and many retirees have been motivated to move into warmer climates because of it.
Heat can change the properties of metals like steel, too. By properties, I mean qualities such as hardness and stiffness–where hardness relates to steel’s ability to resist wear and denting, while stiffness relates to its ability to resist a force that is trying to bend it. Obviously, if things get hot enough, say in the thousands of degrees Fahrenheit, steel will soften and eventually melt into a blob of glowing liquid. At lower temperatures the change will be less dramatic, but its atomic structure will be undergoing change nonetheless. Varying temperatures cause atoms to become energized, causing them to move around within their atomic structure. Depending on how quickly things cool back down, the iron and carbon atoms that make up the steel can end up in different locations, causing a permanent change. The steel could end up softer or harder. For example, slow cooling hot steel in air makes it softer, while rapid cooling, such as when you submerge hot steel quickly into cold oil, makes it harder. How does heat play a part in the ongoing discussion of the centrifugal clutch in a grass trimmer? Well, friction between the shoes and housing generates heat as a result of centrifugal force. Clutch springs are made of steel, which is hard and resistant to bending. But during operation they may heat up to hundreds of degrees, then slowly cool down again when the grass trimmer is shut off. Without getting into a complex explanation of metallurgy, this slow cooling makes the steel in the springs softer, and with time they will lose their stiffness and weaken. Over time the springs become so weak they are unable to overcome the centrifugal force acting on the clutch shoes, causing the clutch to fail at its task of disengaging the cutter head from the engine at idle speed. In other words, as soon as the engine is started, the cutter head will rapidly begin to spin. With these conditions in place, the cutter head poses a threat to anything or anyone making contact with it. Next time we’ll look at another cause of centrifugal clutch failure, that is, component wear due to friction between the clutch shoes and clutch housing. ____________________________________________
|

Mechanical Power Transmission – The Centrifugal Clutch and Metal Fatigue
Sunday, May 13th, 2012|
When I’m under a lot of stress I sometimes have the nervous habit of grabbing a paper clip, straightening out the bends, then repetitively bending it back and forth. Eventually the wire reaches a point where it just breaks apart. My paper clip broke due to metal fatigue. Metal parts are said to become fatigued when they’re subjected to forces of a repetitive nature such as occur due to twisting and bending. The metal cracks, then eventually breaks due to the stress. So what’s happening when metal becomes fatigued? Figure 1 shows the simplified atomic structure of a sample metal.
Figure 1
When the metal is deformed, such as during bending, its rows of atoms are forced to move with respect to each other as shown in Figure 2.
Figure 2
The movement of rows of atoms leads to an alteration in structure, breaking bonds between atoms. This results in small cracks forming along the metal’s surface, cracks which eventually migrate deeper inside the metal with each subsequent bend. With time the metal will become so compromised by the cracks that breakage occurs. Metal fatigue can occur in centrifugal clutch mechanisms as well. Power tools such as grass trimmers typically operate between idle and working speeds many times during a day’s usage. As we learned in previous articles, when the engine runs at idle speed, the springs in the centrifugal clutch mechanism stay retracted. As the engine speeds up, the centrifugal force acting on the clutch shoes extends the springs. Successive extensions and retractions cause the metal in the springs to bend, and over time they, like my paper clip, will become fatigued and metal springs will break. Next time we’ll continue talking about centrifugal clutch failures and learn how the springs of a clutch mechanism can fail without its metal being brought to the breaking point.
____________________________________________
|


Mechanical Power Transmission – The Centrifugal Clutch in Operation
Sunday, April 22nd, 2012| Just the other day I unexpectedly experienced the effects of centrifugal force while driving home from the grocery store. The checker had packed my entire order into one bag, making it top heavy. Then en route someone cut me off at an intersection, and I had to make a sharp turn to avoid a crash. During this maneuver centrifugal force came into play, forcing my grocery bag out of its centered position on the front seat next to me. It lurched into the passenger’s door, fell over, and spilled its contents onto the floor. Fortunately the eggs didn’t get smashed.
In previous articles we identified the component parts of a centrifugal clutch mechanism and learned how centrifugal force makes objects spinning in a circular path about a fixed point move outward. We can now explore what happens when we couple a centrifugal clutch mechanism to the engine of a grass trimmer. Figure 1 depicts the spinning clutch mechanism of a gas engine when it’s just been started and is operating at a slow idle speed.
Figure 1
Like the red ball in my previous article on centrifugal force, the blue centrifugal clutch shoes each have a mass m. They spin around a fixed point P, situated at the center of the yellow engine shaft coupling. Point P is located a distance r from the center of each shoe. The shoes in motion have a tangential velocity V, and in accordance with Sir Isaac Newton’s Law of Centrifugal Force, the force Fc acts upon each shoe, causing them to want to pull out from the center of the mechanism, away from the fixed point. Since idle speed is rather slow, however, the centrifugal force exerted upon the shoes isn’t strong enough to overcome the tension of the two springs and the coils connecting them remain coiled, holding the shoes tightly in position on the green boss. So what happens when we press the throttle trigger on the gas engine and cause the engine to speed up? See Figure 2.
Figure 2
Figure 2 shows the clutch mechanism spinning at an increased velocity. The tangential velocity V increases, and according to Newton’s law, the centrifugal force Fc acting on the clutch shoes increases as well. The force is so strong that it overcomes the tension in the springs and they extend. The clutch shoes are caused to move out and away from fixed point P, as well as from each other, traveling along the ends of the boss. When we remove our finger from the throttle trigger, the engine will slow down and return to idle speed. The centrifugal force will decrease and the springs will pull the shoes back towards fixed point P. The mechanism will return to its previous state, as shown in Figure 1. Next time we’ll insert the centrifugal clutch mechanism into the clutch housing to see how mechanical power is transmitted from the engine to the cutter head in our grass trimmer. ____________________________________________
|


Mechanical Power Transmission – The Centrifugal Clutch Mechanism
Sunday, April 15th, 2012| My journey through engineering school was marked by a cast of colorful characters from around the world. I remember one Russian professor in particular, fond of extolling the virtues of Russian engineering by the statement, “In Soviet Union steel ingots roll in one door, military tanks roll out other door.” During that period of history in his homeland, it was not uncommon for all components down to the smallest screw to be manufactured within the same factory.
That professor taught me all about clutch mechanisms, and whether they’re present in Soviet tanks or grass trimmers they perform the same basic function. Let’s take a look at one now.
Figure 1
Figure l shows my color-enhanced clutch illustration, which makes it easy to identify the different components of a centrifugal clutch. The main part of the clutch is colored green and it’s respectfully referred to as the “boss.” I assume it’s earned the title due to its role in keeping all component parts of the clutch assembly together. The blue portion shows two clutch shoes. The boss fits loosely into notches within the shoes. The curved surfaces on the shoes are composed of a high friction material, and we’ll see why later. Two springs attached to the shoes cause them to pull towards each other and keep them from falling off the ends of the boss. The yellow portion shows the engine shaft coupling. It’s permanently affixed to the center of the boss. This coupling has a hole in it that enables the clutch mechanism to be attached onto an engine shaft with a threaded nut or some other type of mechanical fastener. Now that we’re familiar with a centrifugal clutch’s parts we can see how they come into play in a real world application, that of an engine shaft. We’ll explore that next week. ____________________________________________
|

Mechanical Power Transmission – Centrifugal Force and Centrifugal Clutches
Monday, April 9th, 2012| I’m not a big fan of amusement parks. The first time I rode on a Tilt-A-Whirl I was caught off guard and flung onto my side by the centrifugal force acting upon my body, the lower half of which was constrained by a seat belt so I wouldn’t be catapulted out during the ride. To make matters worse, the centrifugal force started to force the lunch I’d made the mistake of eating just before back up my throat. It was a very unpleasant experience to say the least.
Centrifugal force is an interesting phenomenon, and its principles are involved in the operation of a centrifugal clutch, which we’ll see later. For now, let’s get a basic understanding of what it’s all about, thanks to the discoveries of Sir Isaac Newton in the late 17th Century. Figure 1
Figure 1 shows a red ball, whose mass we’ll notate m, attached to a string, the other end of which is attached to a fixed point, such as if you held it taught between your fingers. If you’re in a playful mood, you might enjoy twirling the ball above your head on its string. The distance between the center of the ball and the fixed point is labeled r, which stands for the radius of the circular path traveled by the ball as it twirls around the fixed point. The speed at which the ball travels through the air is called its straight line velocity, or tangential velocity in scientific-speak, and it is generally notated as a V. The centrifugal force, or Fc, that is exerted upon the ball as it whirls around your head is, Sir Isaac tells us, measured by the equation: Fc = mV2/r Centrifugal force in the simplest of terms is an outward-pushing force that pulls objects in motion away from the point about which they’re rotating. Let’s hold as fact that if m and r don’t change, then Newton’s equation tells us that the centrifugal force exerted upon the object in motion increases by the square of the velocity, or speed, of the ball. In other words, the faster the ball moves as you spin it around your head on the string, the harder the centrifugal force that acts upon it. As you spin the ball faster and faster, it will pull outward more and more strenuously, exerting ever greater resistance upon the string you hold between your fingers. Now suppose we replace the string in this example with a spring as shown in Figure 2.
Figure 2
Why a spring? Because that’s what’s used within a centrifugal clutch. Just as with the string, the ball’s velocity increases as you increase rotation speed around the fixed point, and the centrifugal force acting upon its mass by the spinning action increases as well. The spring expands, extending further and further out from its beginning position of attachment to the fixed point, your fingers. As velocity decreases, the spring will retract, eventually returning to its original coil size. This extending and retracting action is the major mechanism at play within a centrifugal clutch. Next time we’ll explore a centrifugal clutch mechanism in more depth to observe its behavior relative to its spring under the influence of centrifugal force. ____________________________________________
|


Industrial Control Basics – Disconnect Switches
Sunday, March 25th, 2012| Last week our kitchen ceiling fan and light combo decided to stop working. We don’t like eating in the dark, so I was compelled to do some immediate troubleshooting. As an engineer with training in the workings of electricity I have a great respect for it. I’m well aware of potential hazards, and I took a necessary precaution before taking things apart and disconnecting wires. I made the long haul down the stairs to the basement, opened the circuit breaker in the electrical panel, and disabled the flow of electricity to the kitchen. My fears of potential electrocution having been eliminated, my only remaining fear was of tumbling off the ladder while servicing the fan.
Just as I took the precaution to disconnect the power supply before performing electrical maintenance in my home, workers in industrial settings must do the same, and a chief player in those scenarios is the motor overload relay discussed last week. It automatically shuts down electric motors when they become overheated. Let’s revisit that example now.
Figure 1
Our diagram in Figure 1 shows electric current flowing through the circuit by way of the red path. Even if this line were shut down, current would continue to flow along the path, because there is no means to disconnect the entire control system from the hot and neutral lines supplying power to it, that is, it is missing disconnect switches. Electric current will continue to pose a threat to workers were they to attempt a repair to the system. Now let’s see how we can eliminate potential hazards on the line.
Figure 2
In Figure 2 there is an obvious absence of the color red, indicating the lack of current within the system. We accomplished this with the addition of disconnect switches capable of isolating the motor control circuitry, thereby cutting off the hot and neutral lines of the electrical power supply and along with it the unencumbered flow of electricity. These switches are basically the same as those seen in earlier diagrams in our series on industrial controls, the difference here is that the two switches are tied together by an insulated mechanical link. This link causes them to open and close at the same time. The switches are opened and closed manually via a handle. When the disconnect switches are both open electricity can’t flow and nothing can operate. Under these conditions there is no risk of a worker coming along and accidentally starting the conveyor motor. To add yet another level of safety, disconnect switches are often tagged and locked once de-energized. This prevents workers from mistakenly closing them and starting the conveyor while maintenance is being performed. Brightly colored tags alert everyone that maintenance is taking place and the switches must not be closed. The lock that performs this safety function is actually a padlock. It’s inserted through a hole in the switch handle, making it impossible for anyone to flip the switch. Tags and locks are usually placed on switches by maintenance personnel before repairs begin and are removed when work is completed. Now let’s see how our example control system looks in ladder diagram format.
Figure 3
Figure 3 shows a ladder diagram that includes disconnect switches, an emergency stop button, and the motor overload relay contacts. The insulated mechanical link between the two switches is represented by a dashed line. Oddly enough, engineering convention has it that the motor overload relay heater is typically not shown in a ladder diagram, therefore it is not represented here. This wraps up our series on industrial control. Next time we’ll begin a discussion on mechanical clutches and how they’re used to transmit power from gasoline engines to tools like chainsaws and grass trimmers. ____________________________________________
|


Industrial Control Basics – Motor Overload Relay In Action
Sunday, March 18th, 2012|
Last week we explored the topic of thermal expansion, and we learned how the bimetal contacts in a motor overload relay distort when heated. We also discussed how the overload relay comes into play to prevent overheating in electric motor circuits. Now let’s see what happens when an overload situation occurs.
Figure 1
Figure 1 shows a motor becoming overloaded, as it draws in abnormally high amounts of electric current. Since this current also flows through the electric heater in the overload relay, the heater starts producing more heat than it would if the motor were running normally. This abnormally high heat is directed towards the bimetal switch contacts, causing them to curl up tightly until they no longer touch each other and open up. They will only close again when the overload condition is cleared up and the heater cools back down to normal operating temperature. Let’s now take a look at Figure 2 to see how the motor overload relay fits into our example of a conveyor belt motor control circuit. Once again, the path of electric current flow is denoted by red lines.
Figure 2
The circuit in Figure 2 represents what happens after Button 1 is depressed. That is, the electric relay has become latched and current flows between hot and neutral sides through one of the N.O. contacts along the path of the green indicator bulb, the motor overload relay heater, and the conveyor belt motor. The current also flows through the other N.O. contact, the Emergency Stop button, Button 2, the electric relay’s wire coil, and the motor overload relay bimetal contacts. The motor becomes overloaded, causing the overload relay heater to produce abnormally high heat. This heat is directed towards the bimetal contacts, also causing them to heat up.
Figure 3
In Figure 3 the bimetal contacts have heated to the point that they have curled away from each other until they no longer touch. With the bimetal contacts open, electric current is unable to flow through to the electric relay’s wire coil. This in turn ends the magnetic attraction which formerly held the relay armatures against the N.O. contacts. The spring in the electric relay has pulled the armatures up, causing the N.O. contacts to open, simultaneously closing the N.C. contact. These actions have resulted in a loss of current to the green indicator bulb and electric motor. The red indicator bulb is now activated, and the conveyor motor is caused to automatically shut down to prevent damage and possible fire due to overheating. This means that even if the conveyor operator were to immediately press Button 1 in an attempt to restart the line, he would be prevented from doing so. Under these conditions the electric relay is prevented from latching, and the motor remains shut down because the bimetal contacts have been separated, preventing current from flowing through to the wire coil. The bimetal contacts will remain open until they once again cool to normal operating temperature. Once cooled, they will once again close, and the motor can be restarted. If the cause of the motor overload is not diagnosed and its ability to recur eliminated, the automatic shutdown process will repeat this cycle. Next time we’ll see how the overload relay is represented in a ladder diagram. We’ll also see how switches can be added to the circuit to allow maintenance staff to safely work. ____________________________________________
|


Industrial Control Basics – Thermal Expansion Effect on Overload Relays
Sunday, March 11th, 2012| Imagine driving on steel tires, not rubber. Don’t think it would work too well? On asphalt highways maybe not, but on the steel rails that steam locomotives travel upon, steel wheels work surprisingly well and it’s due in large part to the principles of thermal expansion and the different rates at which metal alloys expand and contract. Allow me to explain by analyzing how a locomotive“tire” is changed.
As you can imagine changing locomotive tires isn’t easy. Firstly, locomotive shop mechanics have to actually build a fire around the steel tire to heat it up. The intense heat causes its steel tire to thermally expand, meaning its steel molecules become energized by the heat and begin to vibrate. This causes the molecules to move away from each other, and this results in the tire actually growing slightly in size. This enlargement is just enough to enable mechanics to slip the tire back onto the locomotive’s wheel. Now in place, the tire is allowed to cool back down to ambient air temperatures. Cooling results in the tire’s steel molecules relaxing and moving closer to each other. The tire shrinks back to its original preheated size and tightly wraps itself around the wheel. Thermal expansion properties of metals comes into play in many other instances, including the workings of motor overload relays. Please refer to Figure 1.
Figure 1
Here overload relay components are shown in the foreground box. We see that the relay includes an electric heater and a set of two peculiar looking curved objects. These are bimetal switch contacts, so named because each is made of two, that’s the “bi” part, metal strips with different thermal properties. These strips are positioned back to back, then bonded together and curved into a shape resembling a question mark. Each of the two metals has different properties, namely, one expands at a faster rate and to a greater extent than the other when heated. This differing rate of expansion is indicative of the two metals’ diverse thermal properties. When the bimetal contact is exposed to heat, one metal strip wants to expand a lot, but it is bonded to the other metal strip which only wants to expand a little. The end result is that their point of contact distorts and changes shape. When allowed to cool back down, the metal strips contract and the contact point returns to its original shape. In our next blog we’ll see how the contact shape changes and why this shape change is important. In Figure 1 the motor is running normally and there is no overload situation. Under these conditions the motor draws electric current within the normal limits of its design. That current also flows through the heater in the overload relay causing it to generate heat, but in this situation the heat change is small enough that it doesn’t affect the bimetal switch contacts and cause them to change shape. The temperature at which the switch contacts will warp depends on the overall design of the overload relay as well as its application. Next time we’ll see what part a motor overload plays in conjunction with the overload relay’s heater and bimetal contacts. ____________________________________________
|


