|
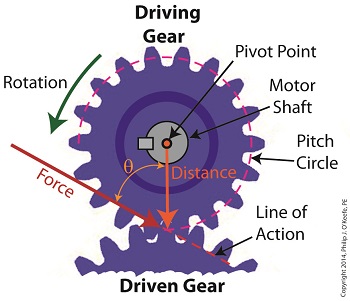
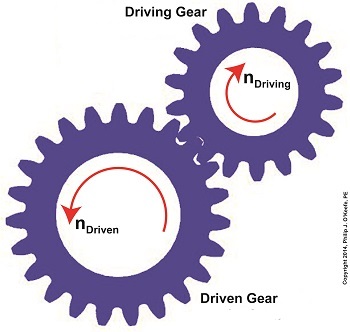
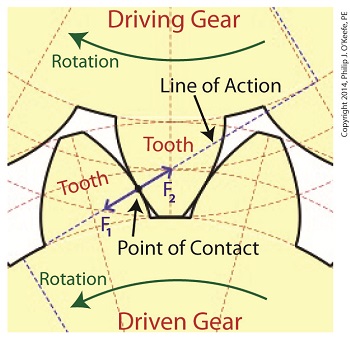
We’ve been discussing torque and how it enables more power to be available to applications such as loosening tight nuts with a wrench. Now we’ll see how those same principles apply to another application, a simple gear train. To review, the torque formula is, Torque = Distance × Force × sin(ϴ) where, Distance and Force are vector magnitudes and ϴ is the angle formed between them. Referring to the gear train illustration above, we see that Force and Distance vectors are present, just as they had been in our previous wrench/nut example. But instead of torque being created by way of force that’s applied to a wrench, things are reversed, and it’s the torque that creates the force. You see, in the wrench/nut example, the force applied to the wrench handle created torque on the nut. In our present gear train example, the torque applied to the motor shaft is created by an electric motor exerting pressure upon the motor shaft, which in turn exerts a force upon the driving gear teeth. The driving gear is also attached to this shaft, so torque causes the driving gear to rotate along with the motor. This rotation results in a force being exerted at the point where the teeth of the driving gear mesh with the teeth of the driven gear. In other words, in the wrench/nut example force created torque, while in the present example torque creates a force. The gear train has a pivot point, as there was in our wrench/nut example, but this time it’s located at the center of the motor shaft rather than at the center of a nut. The pivot point in both examples is where the action takes place. The motor’s shaft and driving gear rotate around it, just as the wrench jaws and handle rotated around the nut’s pivot point. In both examples, the Distance vectors extend out from the pivot points to meet up with the Force vector’s path. In the gear train example, this Force vector path is called a line of action, as introduced earlier in this blog series. This line of action passes through to the point where the driving and driven gear teeth mesh. The force acting upon that point causes the gears in the gear train to rotate, and as they turn mechanical energy is transferred from the motor to whatever machinery component is attached to the shaft of the driven gear. The powered component will then be able to perform useful work such as cutting lumber, mixing frosting for a cake, drilling holes in steel, or propelling vehicles. You will note that there is an angle ϴ which exists between the Distance and Force vectors. Since we have a pivot point, a Force vector, a Distance vector, and an angle ϴ, we are able to apply the torque formula to gear trains exactly as we did in our wrench/nut example. We can then use that formula to calculate how torque is transmitted between gears in the train. Next time we’ll examine the distance and force vectors in a simple gear train. _______________________________________ |
Posts Tagged ‘mechanical engineer’
Torque and Force
Tuesday, April 29th, 2014Achieving Mechanical Advantage Through Torque
Wednesday, March 19th, 2014|
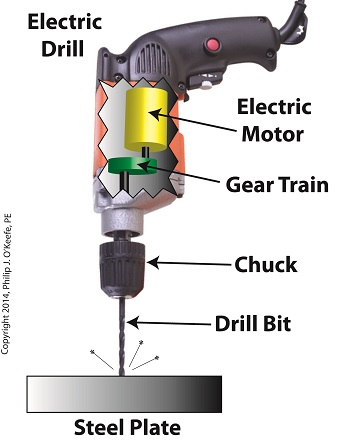
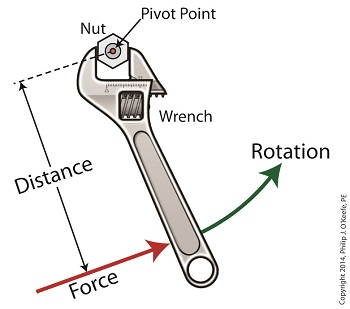
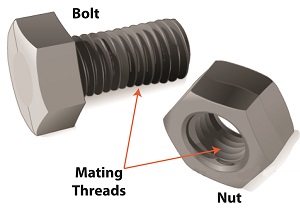
Last time we saw how gear train ratios allow us to change the speed of the driven gear relative to the driving gear. Today we’ll extend this concept further and see how gear trains are used to amplify the mechanical power output of small motors and in so doing create a mechanical advantage, an advantage made possible through the physics of torque. Below is an ordinary electric drill. Let’s see what’s inside its shell. There’s a whole lot of mechanical advantage at work here, giving the drill’s small motor the ability to perform big jobs. A motor and gear train are housed within the drill itself. The motor shaft is coupled to the chuck shaft via the gear train, and by extension, the drill bit. A chuck holds the drill bit in place. It’s the drill’s gear train that provides the small motor with the mechanical advantage necessary for this hand-held power tool to perform the big job of cutting through a thick steel plate. If the gear train and its properly engineered gear ratio weren’t in place and the chuck’s shaft was connected directly to the motor shaft, the motor would be overwhelmed and would stall or become damaged. Either way, the work won’t get done. To understand how operations like these can be performed, we must first familiarize ourselves with the physics concept of torque. Torque allows us to analyze the rotational forces acting upon rotating objects, such as gears in a gear train and wrenches on nuts and bolts. Manipulating torque allows us to achieve a physical advantage when rotating objects around a pivot point. Let’s illustrate this by using a wrench to turn a nut. The nut is fastened to the bolt with threads, interconnecting spiral grooves formed on both the inside of the nut and the outside of the bolt. A wrench is used to loosen and tighten the nut by rotating it on its mating threads. The nut itself rotates about a pivot point which lies at its center. When you use your arm to manipulate the wrench you apply force, a force which is transmitted at a distance from the pivot point. This in turn creates a torque on the nut. In other words, torque is a function of the force acting upon the handle relative to its distance from the pivot point at the center of the nut. Torque can be increased by changing one or both of its acting factors, force and distance. We’ll see how next time when we examine the formula for torque and manipulate it so that a weak arm can loosen even the tightest nut. _______________________________________ |
Gear Reduction Worked Backwards
Sunday, March 9th, 2014|
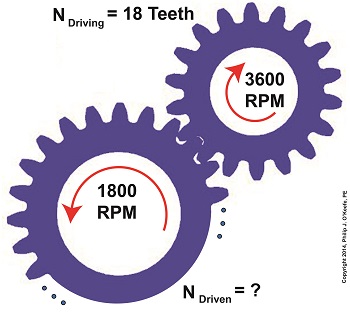
Last time we saw how a gear reduction does as its name implies, reduces the speed of the driven gear with respect to the driving gear within a gear train. Today we’ll see how to work the problem in reverse, so to speak, by determining how many teeth a driven gear must have within a given gear train to operate at a particular desired revolutions per minute (RPM). For our example we’ll use a gear train whose driving gear has 18 teeth. It’s mounted on an alternating current (AC) motor turning at 3600 (RPM). The equipment it’s attached to requires a speed of 1800 RPM to operate correctly. What number of teeth must the driven gear have in order to pull this off? If you’ve identified this to be a word problem, you’re correct. Let’s first review the gear ratio formulas introduced in my previous two articles: R = nDriving ÷ nDriven (1) R = NDriven ÷ NDriving (2) Our word problem provides us with enough information so that we’re able to use Formula (1) to calculate the gear ratio required: R = nDriving ÷ nDriven = 3600 RPM ÷ 1800 RPM = 2 This equation tells us that to reduce the speed of the 3600 RPM motor to the required 1800 RPM, we need a gear train with a gear ratio of 2:1. Stated another way, for every two revolutions of the driving gear, we must have one revolution of the driven gear. Now that we know the required gear ratio, R, we can use Formula (2) to determine how many teeth the driven gear must have to turn at the required 1800 RPM: R = 2 = NDriven ÷ NDriving 2 = NDriven ÷ 18 Teeth NDriven = 2 × 18 Teeth = 36 Teeth The driven gear requires 36 teeth to allow the gear train to operate equipment properly, that is to say, enable the gear train it’s attached to provide a speed reduction of 1800 RPM, down from the 3600 RPM that is being put out from the driving gear. But gear ratio isn’t just about changing speeds of the driven gear relative to the driving gear. Next time we’ll see how it works together with the concept of torque, thus enabling small motors to do big jobs.
_______________________________________ |
Gear Reduction
Wednesday, March 5th, 2014|
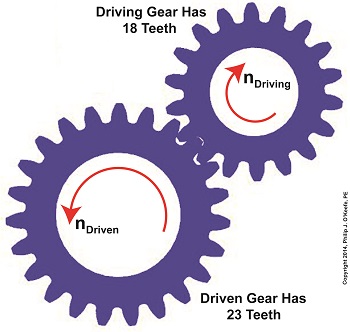
Last time we learned there are two formulas used to calculate gear ratio, R. Today we’ll see how to use them to calculate a gear reduction between gears in a gear train, a strategy which enables us to reduce the speed of the driven gear in relation to the driving gear. If you’ll recall from last time, our formulas to determine gear ratio are: R = NDriven ÷ NDriving (1) R = nDriving ÷ nDriven (2) Now let’s apply them to this example gear train to see how a gear reduction works. Here we have a driven gear with 23 teeth, while the driving gear has 18. For our example the electric motor connected to the driving gear causes it to turn at a speed, nDriving, of 3600 revolutions per minute (RPM). Knowing these numerical values we are able to determine the driven gear speed, nDriven. First we’ll use Formula (1) to calculate the gear ratio using the number of teeth each gear has relative to the other: R = NDriven ÷ NDriving R = 23 Teeth ÷ 18 Teeth R = 1.27 In gear design nomenclature, the gear train is said to have a 1.27 to 1 ratio, commonly denoted as 1.27:1. This means that for every tooth on the driving gear, there are 1.27 teeth on the driven gear. Interestingly, the R’s in both equations (1) and (2) are identical, and in our situation is equal to 1.27, although it is arrived at by different means. In Formula (1) R is derived from calculations involving the number of teeth present on each gear, while Formula (2)’s R is derived by knowing the rotational speeds of the gears. Since R is the common link between the two formulas, we can use this commonality to create a link between them and insert the R value determined in one formula into the other. Since we have already determined that the R value is 1.27 using Formula (1), we can replace the R in Formula (2) with this numerical value. As an equation this looks like: R = 1.27 = nDriving ÷ nDriven Now all we need is one more numerical value to solve Formula (2)’s equation. We know that the speed at which the driving gear is rotating, nDriving , is 3600 RPM. We use basic algebra to calculate the driven gear speed, nDriven : 1.27 = 3600 RPM ÷ nDriven nDriven = 3600 RPM ÷ 1.27 = 2834.65 RPM Based on our calculations, the driven gear is turning at a speed that is slower than the driving gear. To determine exactly how much slower we’ll calculate the difference between their speeds: nDriving – nDriven = 3600 RPM – 2834.65 RPM ≈ 765 RPM So in this gear reduction the driven gear turns approximately 765 RPM slower than the driving gear. Next time we’ll apply a gear reduction to a gear train and see how to arrive at a particular desired output speed. _______________________________________ |
Gear Ratio Formulas
Sunday, February 23rd, 2014|
Last time we introduced a way to convert individual gear speeds in relation to one another within a gear train by employing a conversion tool known as the gear ratio. Today we’ll introduce the gear ratio formulas, of which there are two types. The first formula for determining gear ratio is based on knowing the driving gear revolutions per minute (RPM), notated as nDriving, and the driven gear RPM, nDriven. Given that knowledge we can calculate the gear ratio, R, that exists between them by the formula: R = nDriving ÷ nDriven (1) The other way to determine gear ratio, R, is by knowing the number of teeth on both the driving gear, NDriving, and the driven gear, NDriven. That’s right, it all boils down to simply counting the number of teeth on each gear. In this instance the gear ratio is calculated by the following formula: R = NDriven ÷ NDriving (2) Equations (1) and (2) may look virtually identical, but they’re not. In mechanical engineering calculations, lower case n is typically used to denote the RPM of rotating objects such as shafts, wheels, pulleys, and gears. Upper case N is typically used to denote the number of teeth on a gear. Next time we’ll see how to manipulate these two equations so as to arrive at a particular gear ratio. _______________________________________ |
When Do You Need To Modify Gear Ratio?
Wednesday, February 19th, 2014|
Last time we saw how the involute profile of spur gear teeth ensures smooth contact between gears when they rotate. Today we’ll see why it’s important to be able to change the rotational speed of the driven gear in relation to that of the driving gear by modifying their gear ratio, the speeds at which gears move relative to one another. Why would we want to modify the rotational speeds of gears relative to one another? One reason is to compensate for the fact that alternating electric current (AC) motors drive most modern machinery, and these motors operate at a fixed speed determined by the 60 cycles per second frequency of electricity provided by the utility power grids of North America. By fixed speed I mean that the motor’s shaft revolves at a single, fixed rate. It can’t run any faster or slower. This is fine for some motorized applications, but not others. Basic machinery such as wood cutting saws, grinders, and blowers function well within the parameters of the AC motor’s fixed speed, because their working parts are intended to rotate at the same rate as the motor’s shaft. As a matter of fact, in this instance there’s often no need for a gear train, because the working parts can be connected directly to the motor’s shaft, and the machinery will be powered and function correctly. There are many instances however in which a fixed speed does not match the speed required for more complex machinery to correctly perform precise, specialized tasks. Take a machine tool meant to cut steel bars, for example. It has a rotating part meant to cut through the steel during machining, and to properly do so its cutting tool bit must turn at 400 revolutions per minute (RPM). If it turns any faster, the cut won’t be smooth and the tool bit will overheat and break due to increased friction. If the AC motor driving the machine tool turns at 1750 RPM, a common speed for such motors, then the tool bit will be turning at a much faster rate than the desired 400 RPM, and this presents a problem. To solve the problem we need only add a gear train between the motor and the part containing the tool bit, meaning, we must connect the gear train’s driving gear to the motor’s shaft and a driven gear to the part’s shaft. But in order for this arrangement to work a conversion must take place, that is, we must design the gear train to operate at a specific gear ratio. By gear ratio, I mean the speeds at which the two gears will rotate relative to one another. Next time we’ll introduce the gear ratio formulas that make it all work.
_______________________________________ |
Overcoming Inertia
Monday, February 3rd, 2014|
Inertia. It’s the force that keeps us in bed after the alarm has rung. It seems to have a life of its own, and today we’ll see how it comes into play in keeping other stationary objects at rest. Last time we identified a specific point of contact between spur gear teeth in a gear train and introduced the opposing forces, F1 and F 2, generated there. Today we’ll see what these forces represent, identifying one of them as inertia. So where do these forces come from? They’re forces generated by different means that converge at the same point of contact, the point at which gear teeth mesh. They follow a very specific geometric path to meet there, an imaginary straight line referred to as the line of action. F1 is always generated by a source of mechanical energy. In our locomotive example introduced earlier in this blog series that source is an electric traction motor, upon which a driving gear is mounted. When the motor is energized, a driving force F1 is generated, which causes gear teeth on the driving gear to push against gear teeth of the driven gear. Force F2 is not as straightforward to understand, because it’s not generated by a motor. Instead, it’s the resisting force that the weight of a stationary object poses against its being moved from an at-rest position, known as inertia. The heavier the object, the more inertia it presents with. Trains, of course, are extremely heavy, and to get them to move a great deal of inertia must be overcome. Inertia is also a factor in attempting to stop objects already in motion. To get a stationary locomotive to move, mechanical energy must be transmitted from the driving gear that’s attached to its traction motor, then on to the driven gear attached to its axle. At their point of contact, the driving force of the motor, F1, is met by the resisting force of inertia, F2. In order for the train to move, F1 must be greater than F2. If F1 is less than or equal to F2, then the train won’t leave the station. Next week we’ll animate our static image and watch the interplay between gear teeth, taking note of the line of action during their movement.
_______________________________________ |
Gear Terminology
Sunday, January 5th, 2014|
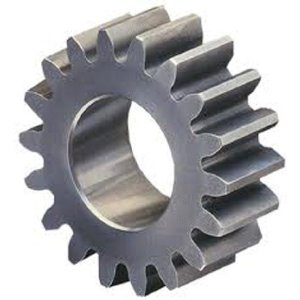
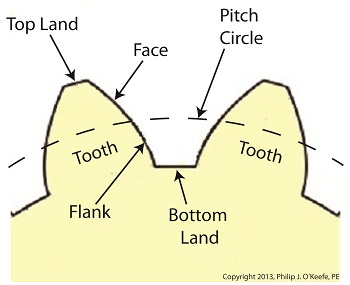
Last time we reviewed the ancient origins of gears and saw how they’ve been around a lot longer than most people realize. Now let’s familiarize ourselves with the terminology of modern gears by taking a look at the most basic and commonly used gear construction, the spur gear. A spur gear is shown below, so named due to its resemblance to spurs commonly found attached to horse riding boots. At their most basic gears are wheels containing many projections which resemble teeth. These teeth are equally spaced around the wheel’s circumference and are designed to mesh, or fit together, with the teeth of other like gears. Looking more closely at the teeth of a modern spur gear, we see they have a rather complex and peculiar curved shape, along with their own terminology. There’s a pitch circle that intersects each gear tooth between the root of the tooth, or bottom land, and the tip of the tooth, or top land. Above the pitch circle each tooth side bears a face. Below the pitch circle and under each face is a flank. Spur gear teeth don’t necessarily have to have this shape. All that’s required is that the teeth fit together in such a way so as to permit fluid interaction between them as they rotate. As a matter of fact, some primitive gears consisted of wooden wheels with teeth made of wooden pegs. These pegs were inserted into evenly spaced holes which were drilled around the circumference of the wheel. The wooden pegs of each wheel would mesh with one another, and when one gear wheel was caused to rotate, its pegs would press against the pegs of the other gear, making it rotate along with it. So if simple pegs worked well enough, then why are modern gear teeth so specifically shaped? We’ll see why next time when we join gears together to form a gear train. ________________________________________ |
The History of Gears
Monday, December 23rd, 2013|
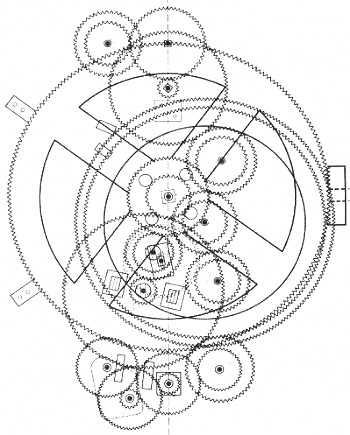
Could it be that after cave men invented the wheel they moved on to invent another circular object, the gear? Gear assemblies are found in a wide variety of applications, from tiny ones used inside wrist watches to massive ones found in aircraft carriers. No one knows for certain when gear technology was first employed, but we do know that gear driven machinery has been around since before the Industrial Revolution. As far back as the Renaissance we’ve documented their use within flour milling equipment and the first primitive clocks. Going even further back in time, Roman engineers are known to have developed a primitive gear driven odometer. It was attached to horse drawn cart wheels and the number of revolutions performed allowed the distance traveled to be calculated. In fact gears have been used far longer than scientists originally thought. In October of the year 1900 sponge divers stumbled upon an ancient Roman shipwreck at the bottom of the Aegean Sea near the Greek island of Antikythera. Inside this wreck they found mineral encrusted fragments of an artifact composed of a bronze alloy. This amazing discovery appeared to be a remarkably modern looking gear assembly which would come to be known as the Antikythera Mechanism.
Analysis of the Mechanism conducted over the last 100 years has revealed it to be a highly complex device. Still visible engraved inscriptions disclose it to be of Greek origin, dating back to about 100 BC. As such it’s the oldest known complex gear driven mechanism in the world. Prior to its discovery it was thought that mechanisms of its kind were not made until 1400 AD. As to the purpose it served, that remains a subject of controversy, since many of its parts are missing.
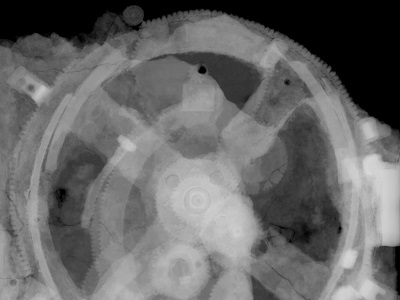
The X-ray image reveals some of the Mechanism’s hidden complexity. Based on detailed examination of these images coupled with engineering analysis, it’s theorized by scientists that the mechanism may have been configured as illustrated below.
Since there’s no evidence that ancient Greeks possessed motors, such as those used in modern clocks, some scientists believe that the gears in the Mechanism were set into motion by simply turning a hand crank. Others believe that the arrangement and size of the gears indicate that the Mechanism’s movement is analogous to planetary motion within our solar system. They theorize further that it may have been used to calculate the positions of the Sun, Moon, and other celestial bodies. Next time we’ll fast forward to present day to familiarize ourselves with the basic terminology of gears and then later see how they’re used in modern devices.
________________________________________ |
How Condensers Increase Efficiency Inside Power Plants
Wednesday, December 4th, 2013|
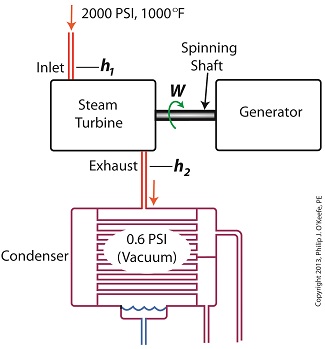
Last time we ran our basic power plant steam turbine without a condenser. In that configuration the steam from the turbine exhaust was simply discharged to the surrounding atmosphere. Today we’ll connect it to a condenser to see how it improves the turbine’s efficiency. As discussed in a previous blog, enthalpy h1 is solely dependent on the pressure and temperature at the turbine inlet. For purposes of today’s discussion, turbine inlet steam pressure and temperature will remain as last time, with values of 2,000 lbs PSI and 1000°F respectively, and calculations today will be based upon those values. So to review, the inlet enthalpy h1 is, h1 = 1474 BTU/lb If the condenser vacuum exists at a pressure of 0.6 PSI, a realistic value for a power plant condenser, then referring to the steam tables in the Van Wylen and Sonntag thermodynamics book, we find that the enthalpy h2 will be, h2 = 847 BTU/lb and the amount of useful work that the turbine can perform with the condenser in place would therefore be, W = h1 – h2 = 1474 BTU/lb – 847 BTU/lb = 627 BTU/lb So essentially with the condenser present, the work of the turbine is increased by 168 BTU/lb (627 BTU/lb – 459 BTU/lb). To put this increase into terms we can relate to, consider this. Suppose there’s one million pounds of steam flowing through the turbine each hour. Knowing this, the turbine power increase, P, is calculated to be, P = (168 BTU/lb) ´ (1,000,000 lb/hr) = 168,000,000 BTU/hr Now according to Marks’ Standard Handbook for Mechanical Engineers, a popular general reference book in mechanical engineering circles, one BTU per hour is equivalent to 0.000393 horsepower, or HP. So converting turbine power, P, to horsepower, HP, we get, P = (168,000,000 BTU/hr) ´ (0.000393 HP/BTU/hr) = 66,025 HP A typical automobile has a 120 HP engine, so this equation tells us that the turbine horsepower output was increased a great deal simply by adding a condenser to the turbine exhaust. In fact, it was increased to the tune of the power behind approximately 550 cars! What all this means is that the stronger the vacuum within the condenser, the greater the difference between h1 and h2 will be. This results in increased turbine efficiency and work output, as evidenced by the greater numeric value for W. Put another way, the turbine’s increased efficiency is a direct result of the condenser’s vacuum forming action and its recapturing of the steam that would otherwise escape from the turbine’s exhaust into the atmosphere. This wraps up our series on the power plant water-to-steam cycle. Next time we’ll use the power of 3D animation to turn a static 2D image of a centrifugal clutch into a moving portrayal to see how it works. ________________________________________ |
